
I have already created multiple authentication tutorial in laravel using middleware with role wise and using guard. In this laravel role based authentication tutorial, I will explain, how we can create role based auth system in laravel.
According to users role, user can see or visit their respective page to access. To create this role based authentication system in laravel, I will not use any package. With our own custom code, we will implement multiple role based authentication in laravel 9. So let's see how we can implement role based authentication tutorial.
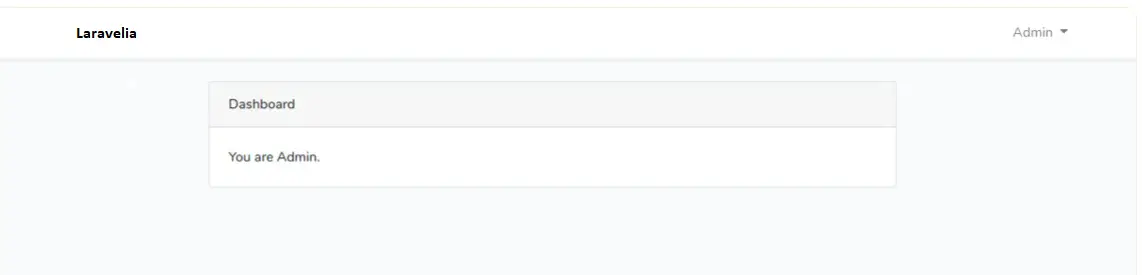
Admin After Login
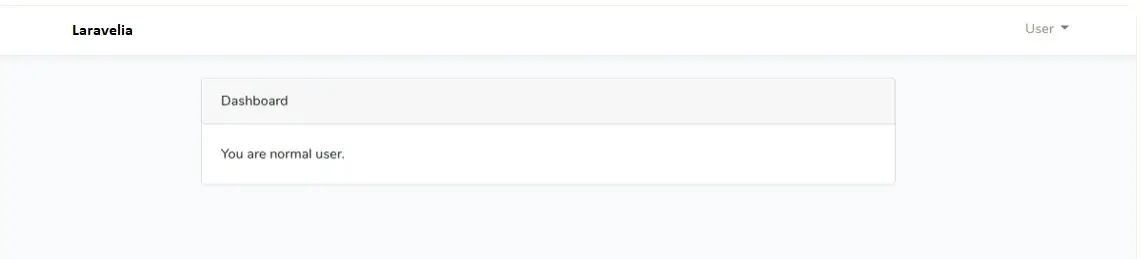
User After Login
Step 1: Install Laravel
First of all, we need to get a fresh Laravel 9 version application using the bellow command, So open your terminal OR command prompt and run the bellow command to start laravel 9 role based authentication tutorial.
composer create-project laravel/laravel example-app
Step 2: Connect Database
After successfully installing the laravel app and then configuring the database setup. We will open the ".env" file and change the database name, username and password in the env file.
.env
DB_CONNECTION=mysql
DB_HOST=127.0.0.1
DB_PORT=3306
DB_DATABASE=Enter_Your_Database_Name
DB_USERNAME=Enter_Your_Database_Username
DB_PASSWORD=Enter_Your_Database_Password
Read also: Laravel 9 Multi Auth Without User Model Using Guard
Step 3: Create Migration and Model
We need a role model and user_roles table. so create it by the following command.
php artisan make:model Role -m
php artisan make:migration create_role_user_table
Now paste this below code
database/migration/create_roles_table.php
<?php

use Illuminate\Support\Facades\Schema;
use Illuminate\Database\Schema\Blueprint;
use Illuminate\Database\Migrations\Migration;

class CreateRolesTable extends Migration
{
    /**
     * Run the migrations.
     *
     * @return void
     */
    public function up()
    {
        Schema::create('roles', function (Blueprint $table) {
            $table->increments('id');
            $table->string('name');
            $table->string('description');
            $table->timestamps();
        });
    }

    /**
     * Reverse the migrations.
     *
     * @return void
     */
    public function down()
    {
        Schema::dropIfExists('roles');
    }
}
database/migration/create_roles_user_table.php
<?php

use Illuminate\Support\Facades\Schema;
use Illuminate\Database\Schema\Blueprint;
use Illuminate\Database\Migrations\Migration;

class CreateRoleUserTable extends Migration
{
    /**
     * Run the migrations.
     *
     * @return void
     */
    public function up()
    {
        Schema::create('role_user', function (Blueprint $table) {
            $table->increments('id');
            $table->integer('role_id')->unsigned();
            $table->integer('user_id')->unsigned();
            $table->timestamps();
        });
    }

    /**
     * Reverse the migrations.
     *
     * @return void
     */
    public function down()
    {
        Schema::dropIfExists('role_user');
    }
}
Step 4 : Update User Model
In this step, we need to modify the User model as below.
app\Models\User.php
<?php

namespace App\Models;

use Illuminate\Notifications\Notifiable;
use Illuminate\Contracts\Auth\MustVerifyEmail;
use Illuminate\Foundation\Auth\User as Authenticatable;

class User extends Authenticatable
{
    use Notifiable;

    protected $fillable = [
        'name', 'email', 'password',
    ];

    protected $hidden = [
        'password', 'remember_token',
    ];

    protected $casts = [
        'email_verified_at' => 'datetime',
    ];

    public function roles()
    {
        return $this
            ->belongsToMany(Role::class)
            ->withTimestamps();
    }

    public function users()
    {
        return $this
            ->belongsToMany(User::class)
            ->withTimestamps();
    }

    public function authorizeRoles($roles)
    {
      if ($this->hasAnyRole($roles)) {
        return true;
      }
      abort(401, 'This action is unauthorized.');
    }

    public function hasAnyRole($roles)
    {
      if (is_array($roles)) {
        foreach ($roles as $role) {
          if ($this->hasRole($role)) {
            return true;
          }
        }
      } else {
        if ($this->hasRole($roles)) {
          return true;
        }
      }
      return false;
    }

    public function hasRole($role)
    {
      if ($this->roles()->where(‘name’, $role)->first()) {
        return true;
      }
      return false;
    }
}
Now you have to run this migration by following the command:
php artisan migrate
Read also: Laravel 9 Multi Auth - Create Multiple Authentication In Laravel
Step 5: Create Auth Scaffold
Now we need the default auth system to login and register user. Here, we will use laravel ui package and create auth scaffold with the bootstrap framework. let's follow bellow command:
composer require laravel/ui
Now create a simple bootstrap auth system:
php artisan ui bootstrap --auth
And run npm i and npm run dev to compile javascript assets.
Step 5 : Create Middleware
In this step, we need to create middleware to control user access. So create middleware by following the command.
php artisan make:middleware CheckRole
Now open CheckRole middleware and update with the below code:
app/Http/middleware/CheckRole.php
<?php

namespace App\Http\Middleware;

use Closure;

class CheckRole
{
    /**
     * Handle an incoming request.
     *
     * @param  \Illuminate\Http\Request  $request
     * @param  \Closure  $next
     * @return mixed
     */
    public function handle($request, Closure $next, $role)
    {
        if (! $request->user()->hasRole($role)) {
            abort(401, 'This action is unauthorized.');
        }
        return $next($request);
    }
}
And now register the middleware by adding it to the Kernel.php file.
app/Http/Kernel.php
 protected $routeMiddleware = [
        'auth' => \App\Http\Middleware\Authenticate::class,
        'auth.basic' => \Illuminate\Auth\Middleware\AuthenticateWithBasicAuth::class,
        'bindings' => \Illuminate\Routing\Middleware\SubstituteBindings::class,
        'cache.headers' => \Illuminate\Http\Middleware\SetCacheHeaders::class,
        'can' => \Illuminate\Auth\Middleware\Authorize::class,
        'guest' => \App\Http\Middleware\RedirectIfAuthenticated::class,
        'signed' => \Illuminate\Routing\Middleware\ValidateSignature::class,
        'throttle' => \Illuminate\Routing\Middleware\ThrottleRequests::class,
        'verified' => \Illuminate\Auth\Middleware\EnsureEmailIsVerified::class,
        'role' => \App\Http\Middleware\CheckRole::class,
];
Step 6: Create Route
In this step, we need to create two routes. one for admin and the other for super admin.
routes/web.php
<?php

use App\Http\Controllers\AdminController;
use App\Http\Controllers\SuperAdminController;
use Illuminate\Http\Request;
use Illuminate\Support\Facades\Route;

/*
|--------------------------------------------------------------------------
| API Routes
|--------------------------------------------------------------------------
|
| Here is where you can register API routes for your application. These
| routes are loaded by the RouteServiceProvider within a group which
| is assigned the "api" middleware group. Enjoy building your API!
|
*/

Route::get('/admin', [AdminController::class,'index']);
Route::get('/superadmin', [SuperAdminController::class,'index']);
Step 7: Create Controller
Let’s create two new controllers AdminController and SuperAdminController to create a user role base login system in laravel.
php artisan make:controller AdminController
php artisan make:controller SuperAdminController
Now update both controllers with the below code:
app/Http/Controllers/AdminController.php
<?php

namespace App\Http\Controllers;

use Illuminate\Http\Request;

class AdminController extends Controller
{
    public function __construct()
    {
        $this->middleware('auth');
        $this->middleware('role:ROLE_ADMIN');
    }

    public function index()
    {
        return view('admin.home');
    }
}
Now update both controllers with the below code:
app/Http/Controllers/SuperAdminController.php
<?php

namespace App\Http\Controllers;

use Illuminate\Http\Request;

class SuperAdminController extends Controller
{
    public function __construct()
    {
        $this->middleware('auth');
        $this->middleware('role:ROLE_SUPERADMIN');
    }

    public function index()
    {
        return view('superadmin.home');
    }
}
Step 8 : Create Blade File
Almost all are set. Let’s now need to build home page views for both the admin and super admin sections of the application.
resources/views/admin/home.blade.php
@extends('layouts.app')

@section('content')
<div class="container">
    <div class="row">
        <div class="col-md-8 col-md-offset-2">
            <div class="panel panel-default">
                <div class="panel-heading">Admin Dashboard</div>

                <div class="panel-body">
                    @if (session('status'))
                        <div class="alert alert-success">
                            {{ session('status') }}
                        </div>
                    @endif

                    This is Admin Dashboard. You must be privileged to be here !
                </div>
            </div>
        </div>
    </div>
</div>
@endsection
And for super admin
resources/views/superadmin/home.blade.php
@extends('layouts.app')

@section('content')
<div class="container">
    <div class="row">
        <div class="col-md-8 col-md-offset-2">
            <div class="panel panel-default">
                <div class="panel-heading">Super Admin Dashboard</div>

                <div class="panel-body">
                    @if (session('status'))
                        <div class="alert alert-success">
                            {{ session('status') }}
                        </div>
                    @endif

                        This is Admin Dashboard. You must be super privileged to be here !
                </div>
            </div>
        </div>
    </div>
</div>
@endsection
Read also: How To Implement Remember Me With Expiration Time In Laravel?
Ok, now we are ready to go and test laravel 9 role based multi auth tutorial. So let's run the project using this command:
php artisan serve
Now you can test our application by visiting the below URL:
URL
Conclusion
Now we know laravel role based multi authentication system implementation. Hope this multiple role based authentication in laravel 9 tutorial will help you to create multi authentication system in laravel using role wise.