
Lumen is a micro-framework of Laravel for developing API. If you want to develop only API with Laravel, then Laravel Lumen will be the best option rather than Laravel. In this tutorial, I will show you how to create an API authentication system using the Laravel Lumen 10 version.
I will use JWT for creating this lumen authentication jwt tutorial. So from this Lumen authentication tutorial, there are several options to create this laravel lumen 10 API authentication. You will see how do you use JWT in Lumen.
Lumen is a bit different from Laravel but almost the same. Just there are some artisan commands that are not available in Lumen. So we have to manually create them. So let's see what is Laravel lumen and lumen authentication jwt authentication.
Step 1: Install Lumen 10
First of all, we need to get a fresh Lumen 10 version application using the bellow command to start Lumen 10 jwt authentication.
composer create-project --prefer-dist laravel/lumen blog-api
Step 2: Create Configuration file
Now in this step, we have to create a configuration file. Now create and update it like below:
config/auth.php
<?php

return [
    'defaults' => [
        'guard' => 'api',
        'passwords' => 'users',
    ],

    'guards' => [
        'api' => [
            'driver' => 'jwt',
            'provider' => 'users',
        ],
    ],

    'providers' => [
        'users' => [
            'driver' => 'eloquent',
            'model' => \App\Models\User::class
        ]
    ]
];
Step 3: Install JWT Package
To create Lumen JWT authentication, I will use tymon/jwt-auth. So install it via the below command:
composer require tymon/jwt-auth:*
Now update the following file:
bootstrap/app.php
<?php

require_once __DIR__.'/../vendor/autoload.php';

(new Laravel\Lumen\Bootstrap\LoadEnvironmentVariables(
    dirname(__DIR__)
))->bootstrap();

date_default_timezone_set(env('APP_TIMEZONE', 'UTC'));

/*
|--------------------------------------------------------------------------
| Create The Application
|--------------------------------------------------------------------------
|
| Here we will load the environment and create the application instance
| that serves as the central piece of this framework. We'll use this
| application as an "IoC" container and router for this framework.
|
*/

$app = new Laravel\Lumen\Application(
    dirname(__DIR__)
);

$app->withFacades();

$app->withEloquent();

/*
|--------------------------------------------------------------------------
| Register Container Bindings
|--------------------------------------------------------------------------
|
| Now we will register a few bindings in the service container. We will
| register the exception handler and the console kernel. You may add
| your own bindings here if you like or you can make another file.
|
*/

$app->singleton(
    Illuminate\Contracts\Debug\ExceptionHandler::class,
    App\Exceptions\Handler::class
);

$app->singleton(
    Illuminate\Contracts\Console\Kernel::class,
    App\Console\Kernel::class
);

/*
|--------------------------------------------------------------------------
| Register Config Files
|--------------------------------------------------------------------------
|
| Now we will register the "app" configuration file. If the file exists in
| your configuration directory it will be loaded; otherwise, we'll load
| the default version. You may register other files below as needed.
|
*/

$app->configure('app');

/*
|--------------------------------------------------------------------------
| Register Middleware
|--------------------------------------------------------------------------
|
| Next, we will register the middleware with the application. These can
| be global middleware that run before and after each request into a
| route or middleware that'll be assigned to some specific routes.
|
*/

// $app->middleware([
//     App\Http\Middleware\ExampleMiddleware::class
// ]);

$app->routeMiddleware([
    'auth' => App\Http\Middleware\Authenticate::class,
]);

/*
|--------------------------------------------------------------------------
| Register Service Providers
|--------------------------------------------------------------------------
|
| Here we will register all of the application's service providers which
| are used to bind services into the container. Service providers are
| totally optional, so you are not required to uncomment this line.
|
*/

//$app->register(App\Providers\AppServiceProvider::class);
$app->register(App\Providers\AuthServiceProvider::class);
// $app->register(App\Providers\EventServiceProvider::class);
$app->register(Tymon\JWTAuth\Providers\LumenServiceProvider::class);

/*
|--------------------------------------------------------------------------
| Load The Application Routes
|--------------------------------------------------------------------------
|
| Next we will include the routes file so that they can all be added to
| the application. This will provide all of the URLs the application
| can respond to, as well as the controllers that may handle them.
|
*/

$app->router->group([
    'namespace' => 'App\Http\Controllers',
], function ($router) {
    require __DIR__.'/../routes/web.php';
});

return $app;
Now run the below command to generate the JWT key:
php artisan jwt:secret
Step 4: Connect Database
I am going to use the MYSQL database for this lumen jwt authentication example. So connect the database by updating.env like this:
.env
DB_CONNECTION=mysql
DB_HOST=127.0.0.1
DB_PORT=3306
DB_DATABASE=YOUR_DB_NAME
DB_USERNAME=YOUR_DB_USERNAME
DB_PASSWORD=YOUR_DB_PASSWORD
Now run php artisan migrate command to migrate the database.
Read also: Laravel 10 JWT - Complete API Authentication Tutorial
Step 5: Create Migration
Lumen does not provide a "users" table. So we need to create it by the following command:
php artisan make:migration create_users_table
Now update it like this:
<?php

use Illuminate\Database\Migrations\Migration;
use Illuminate\Database\Schema\Blueprint;
use Illuminate\Support\Facades\Schema;

return new class extends Migration
{
    /**
     * Run the migrations.
     */
    public function up(): void
    {
        Schema::create('users', function (Blueprint $table) {
            $table->id();
            $table->string('name');
            $table->string('email')->unique();
            $table->string('password');
            $table->rememberToken();
            $table->timestamps();
        });
    }

    /**
     * Reverse the migrations.
     */
    public function down(): void
    {
        Schema::dropIfExists('users');
    }
};
Step 6: Create User Seeder
I am not going to create a registration system. So we need to create a User seeder like that:
php artisan make:seeder UserSeeder
Now update the seeder like this:
Database\Seeders\UserSeeder.php
<?php

namespace Database\Seeders;

use App\Models\User;
use Illuminate\Database\Seeder;
use Illuminate\Support\Facades\Hash;
use Illuminate\Database\Console\Seeds\WithoutModelEvents;

class UserSeeder extends Seeder
{
    /**
     * Run the database seeds.
     */
    public function run(): void
    {
        User::create([
            'name' => 'Laravelia',
            'email' => 'laravelia@web.com',
            'password' => Hash::make('password')
        ]);
    }
}
Now update the database seeder class like this:
Database\Seeders\DatabaseSeeder.php
<?php

namespace Database\Seeders;

use Illuminate\Database\Console\Seeds\WithoutModelEvents;
use Illuminate\Database\Seeder;

class DatabaseSeeder extends Seeder
{
    /**
     * Run the database seeds.
     *
     * @return void
     */
    public function run()
    {
        $this->call(UserSeeder::class);
    }
}
Now run this command to create a new user
php artisan db:seed
Step 7: Create Route
Now in this step, we have to create a route for creating our lumen jwt authentication example:
routes/web.php
<?php

use App\Http\Controllers\LumenAuthController;

/** @var \Laravel\Lumen\Routing\Router $router */

/*
|--------------------------------------------------------------------------
| Application Routes
|--------------------------------------------------------------------------
|
| Here is where you can register all of the routes for an application.
| It is a breeze. Simply tell Lumen the URIs it should respond to
| and give it the Closure to call when that URI is requested.
|
*/

$router->get('/', function () use ($router) {
    return $router->app->version();
});

$router->group(['prefix' => 'api'], function () use ($router) {
    $router->post('login', 'LumenAuthController@login');
    $router->post('logout', 'LumenAuthController@logout');
    $router->post('refresh', 'LumenAuthController@refresh');
    $router->post('me', 'LumenAuthController@me');
});
Step 8: Create Controller
Now we have to create AuthController to complete our laravel lumen 10 api authentication tutorial. So run the below command to create a controller:
php artisan make:controller LumenAuthController
Now update this controller like this:
App\Http\Controllers\LumenAuthController.php
<?php

namespace App\Http\Controllers;

use Illuminate\Http\Request;
use Illuminate\Support\Facades\Auth;

class LumenAuthController extends Controller
{
    public function __construct()
    {
        $this->middleware('auth:api', ['except' => ['login', 'refresh', 'logout']]);
    }
    /**
     * Get a JWT via given credentials.
     *
     * @param  Request  $request
     * @return Response
     */
    public function login(Request $request)
    {
        $this->validate($request, [
            'email' => 'required|string',
            'password' => 'required|string',
        ]);

        $credentials = $request->only(['email', 'password']);

        if (! $token = Auth::attempt($credentials)) {
            return response()->json(['message' => 'Invalid credentials'], 401);
        }

        return $this->jsonResponse($token);
    }

     /**
     * Get the authenticated User.
     *
     * @return \Illuminate\Http\JsonResponse
     */
    public function me()
    {
        return response()->json(auth()->user());
    }

    /**
     * Log the user out (Invalidate the token).
     *
     * @return \Illuminate\Http\JsonResponse
     */
    public function logout()
    {
        auth()->logout();

        return response()->json(['message' => 'Successfully logged out']);
    }

    /**
     * Refresh a token.
     *
     * @return \Illuminate\Http\JsonResponse
     */
    public function refresh()
    {
        return $this->jsonResponse(auth()->refresh());
    }

    /**
     * Get the token array structure.
     *
     * @param  string $token
     *
     * @return \Illuminate\Http\JsonResponse
     */
    protected function jsonResponse($token)
    {
        return response()->json([
            'access_token' => $token,
            'token_type'   => 'bearer',
            'user'         => auth()->user(),
            'expires_in'   => auth()->factory()->getTTL() * 60 * 24
        ]);
    }
}
Step 9: Update User Model
Now in this final step, we need to update the User model. So update the model like that:
App\Models\User.php
<?php

namespace App\Models;

use Illuminate\Auth\Authenticatable;
use Illuminate\Contracts\Auth\Access\Authorizable as AuthorizableContract;
use Illuminate\Contracts\Auth\Authenticatable as AuthenticatableContract;
use Illuminate\Database\Eloquent\Factories\HasFactory;
use Illuminate\Database\Eloquent\Model;
use Laravel\Lumen\Auth\Authorizable;
use Tymon\JWTAuth\Contracts\JWTSubject;

class User extends Model implements AuthenticatableContract, AuthorizableContract, JWTSubject
{
    use Authenticatable, Authorizable, HasFactory;

    /**
     * The attributes that are mass assignable.
     *
     * @var string[]
     */
    protected $fillable = [
        'name', 'email', 'password'
    ];

    /**
     * The attributes excluded from the model's JSON form.
     *
     * @var string[]
     */
    protected $hidden = [
        'password',
    ];

    /**
     * Get the identifier that will be stored in the subject claim of the JWT.
     *
     * @return mixed
     */
    public function getJWTIdentifier()
    {
        return $this->getKey();
    }

    /**
     * Return a key value array, containing any custom claims to be added to the JWT.
     *
     * @return array
     */
    public function getJWTCustomClaims()
    {
        return [];
    }
}
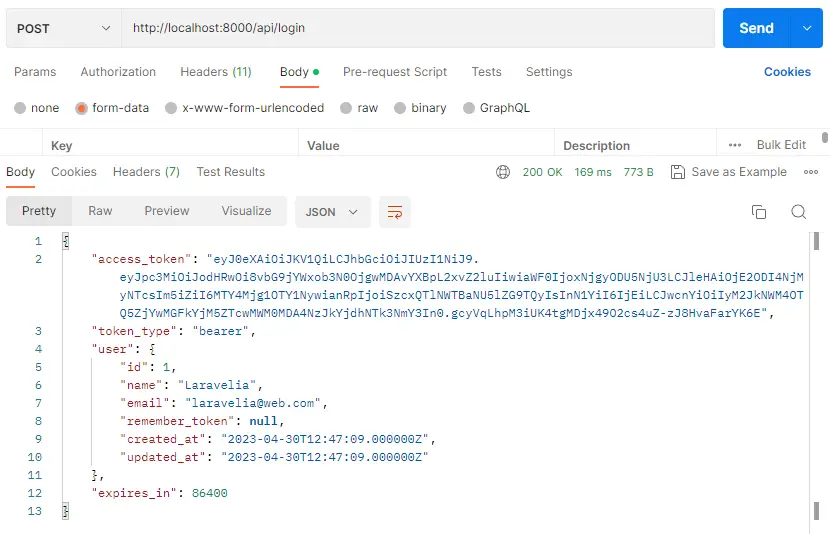
Now if you start your server by running php artisan serve and test all API via Postman like this:
LOGIN API
And look at that Postman output:
Read also: How To Create API With Sanctum Authentication In Laravel 10?
Conclusion
Now we know how do you authenticate in Lumen 10. Now we also know how to create JWT authentication in Lumen. Hope now you can create this lumen jwt authentication example in your own Lumen application. Hope this lumen 10 jwt authentication tutorial will help you.