
In this tutorial, we will see how to call nested relationships in laravel application. You know that we can easily call laravel multi level relationship. In this tutorial, I will show you laravel eager loading multiple relationships and for that, I will create one user, and that user has many posts and that post has many comments and that comment has many replies. I will show you how we can call all of those multi level relationships in laravel application.
So this nested with laravel tutorial is going to help you to learn how to call nested multiple relationships in Laravel. So let's see the example code and scenario.
Step 1: Install Laravel
First of all, we need to get a fresh Laravel 9 version application using the bellow command, So open your terminal OR command prompt and run the bellow command to start nested with laravel.
composer create-project laravel/laravel example-app
Read also: Laravel Passwordless Login | Login With Username In Laravel
Step 2: Connect Database
We need registration, so need a database table to save user data. We will open the ".env" file and change the database name, username and password in the env file and create laravel multi-level relationship.
.env
DB_CONNECTION=mysql
DB_HOST=127.0.0.1
DB_PORT=3306
DB_DATABASE=Enter_Your_Database_Name
DB_USERNAME=Enter_Your_Database_Username
DB_PASSWORD=Enter_Your_Database_Password
Step 3: Create and Update Model
Now in this step, we will create some models like Post Comment and Reply. So run the below command to create it:
php artisan make:model Post -m
php artisan make:model Comment -m
php artisan make:model Reply -m
Now update the model like:
app/Models/User.php
<?php

namespace App\Models;

use Laravel\Scout\Searchable;
use Laravel\Sanctum\HasApiTokens;
use Illuminate\Notifications\Notifiable;
use Illuminate\Contracts\Auth\MustVerifyEmail;
use Illuminate\Database\Eloquent\Factories\HasFactory;
use Illuminate\Database\Eloquent\Relations\HasMany;
use Illuminate\Foundation\Auth\User as Authenticatable;

class User extends Authenticatable implements MustVerifyEmail
{
    use HasApiTokens, HasFactory, Notifiable, Searchable;

    protected $fillable = [
        'name',
        'email',
        'password',
    ];

    public function posts() : HasMany
    {
        return $this->hasMany(Post::class);
    }
}
Now update the Post model by creating the below relationship with comments.
app/Models/Post.php
<?php

namespace App\Models;

use Illuminate\Database\Eloquent\Model;
use Illuminate\Database\Eloquent\Relations\HasMany;
use Illuminate\Database\Eloquent\Factories\HasFactory;

class Post extends Model
{
    use HasFactory;

    public function comments() : HasMany
    {
        return $this->hasMany(Comment::class);
    }
}
Now update the Comment model by creating the below relationship with replies.
app/Models/Comment.php
<?php

namespace App\Models;

use Illuminate\Database\Eloquent\Factories\HasFactory;
use Illuminate\Database\Eloquent\Model;
use Illuminate\Database\Eloquent\Relations\BelongsTo;
use Illuminate\Database\Eloquent\Relations\HasMany;

class Comment extends Model
{
    use HasFactory;

    public function replies() : HasMany
    {
        return $this->hasMany(Reply::class);
    }

    public function post() : BelongsTo
    {
        return $this->belongsTo(Post::class);
    }
}
Now update the Reply model by creating the below relationship with comments.
app/Models/Reply.php
<?php

namespace App\Models;

use Illuminate\Database\Eloquent\Factories\HasFactory;
use Illuminate\Database\Eloquent\Model;
use Illuminate\Database\Eloquent\Relations\BelongsTo;

class Reply extends Model
{
    use HasFactory;

    public function comment() : BelongsTo
    {
        return $this->belongsTo(Comment::class);
    }
}
Read also: Optimize Query With Laravel Eloquent Eager Loading
Step 4: Create Dauumy Data
Now in this step, we will create dummy relationship data. So update the seeder class like this:
Database\Seeders\DatabaseSeeder.php
<?php

namespace Database\Seeders;

use App\Models\User;
use Illuminate\Database\Seeder;

class DatabaseSeeder extends Seeder
{
    public function run()
    {
        User::factory(1)->create()
            ->each(function($user){
            $user->posts()->create([
                'title' => fake()->paragraph()
            ])->each(function($post){
                $post->comments()->create([
                    'comment' => fake()->sentence()
                ])->each(function($comment){
                    $comment->replies()->create([
                        'reply' => fake()->sentence()
                    ]);
                });
            });
        });
    }
}
Now run php artisan migrate command to migrate and the database.
php artisan migrate
Now run the seeder command to generate some user posts comments and replies.
php artisan db:seed
Step 5: Create Route
Here, we need to add one more route for the admin user home page so let's add that route in the web.php file.
routes/web.php
<?php

use Illuminate\Support\Facades\Route;
use App\Http\Controllers\TutorialController;

/*
|--------------------------------------------------------------------------
| Web Routes
|--------------------------------------------------------------------------
|
| Here is where you can register web routes for your application. These
| routes are loaded by the RouteServiceProvider within a group which
| contains the "web" middleware group. Now create something great!
|
*/

Route::get('/', [TutorialController::class,'index'])->name('search');
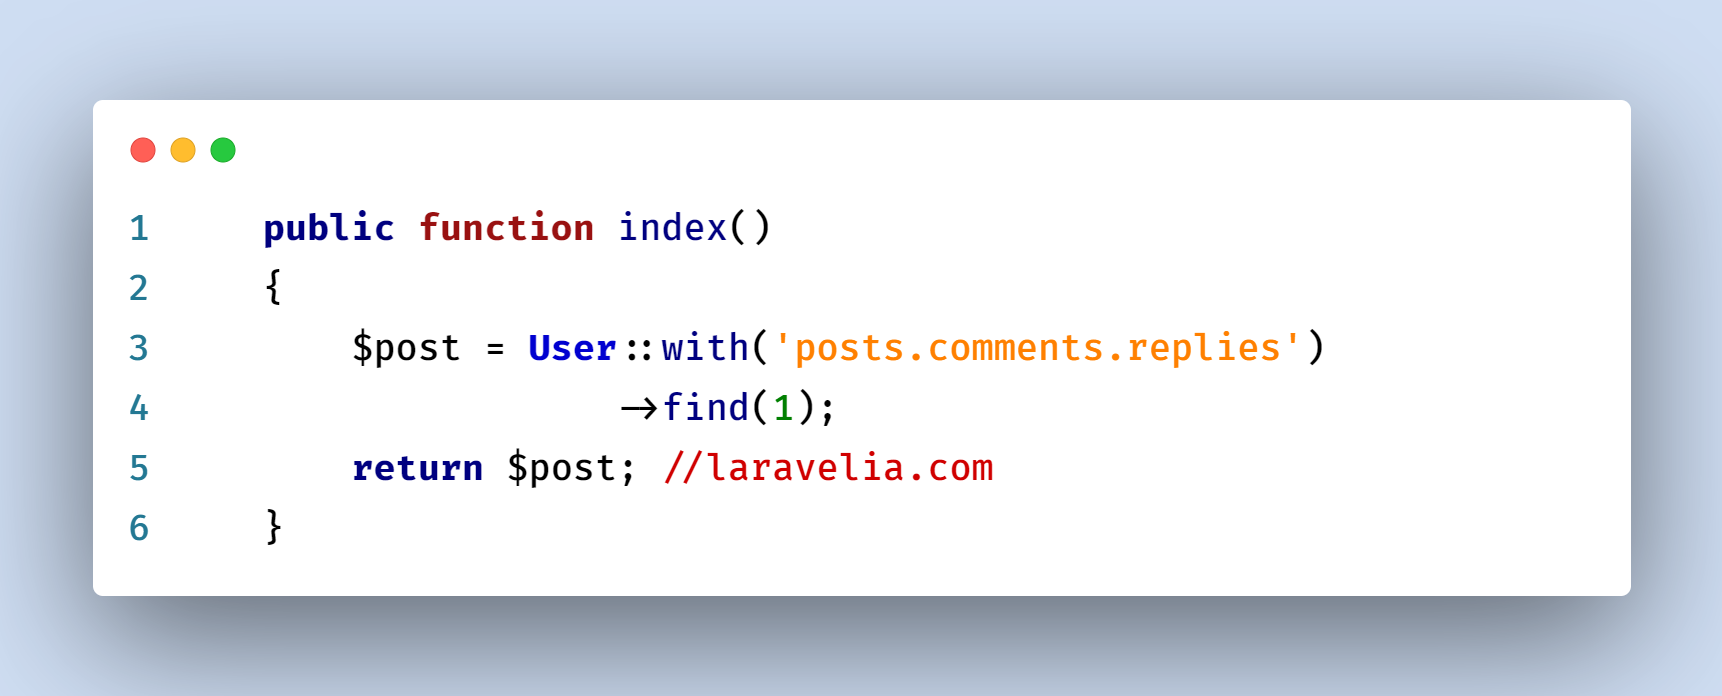
Step 6: Update Controller
Now we need to update tutorial controller to load multi level relationship.
app/Http/Controllers/TutorialController.php
<?php

namespace App\Http\Controllers;

use App\Models\User;
use Illuminate\Http\Request;

class TutorialController extends Controller
{
    public function index()
    {
        $post = User::with('posts.comments.replies')
                    ->find(1);
        return $post;
    }
}
Ok, now we are ready to go and test laravel nested eager loading with a condition example tutorial. So let's run the project using this command:
php artisan serve
Now you can test our application by visiting the below URL:
URL
Now you will see the below nested relational data output like this:
{
    "id": 1,
    "name": "Candida Hickle I",
    "email": "jocelyn.murazik@example.net",
    "email_verified_at": "2023-01-15T04:59:17.000000Z",
    "status": "active",
    "created_at": "2023-01-15T04:59:17.000000Z",
    "updated_at": "2023-01-15T04:59:17.000000Z",
    "posts": [
        {
            "id": 1,
            "user_id": 1,
            "title": "Maxime non architecto quia in corporis iusto odio beatae. Harum cupiditate libero dicta et fuga vero. Autem facere id reprehenderit consectetur.",
            "is_published": 1,
            "created_at": "2023-01-15T04:59:18.000000Z",
            "updated_at": "2023-01-15T04:59:18.000000Z",
            "comments": [
                {
                    "id": 1,
                    "post_id": 1,
                    "comment": "Magnam quia aperiam velit fuga dolorem rerum.",
                    "is_approved": 0,
                    "created_at": "2023-01-15T04:59:18.000000Z",
                    "updated_at": "2023-01-15T04:59:18.000000Z",
                    "replies": [
                        {
                            "id": 1,
                            "comment_id": 1,
                            "reply": "Dolores aut consectetur itaque est aut.",
                            "created_at": "2023-01-15T04:59:18.000000Z",
                            "updated_at": "2023-01-15T04:59:18.000000Z"
                        }
                    ]
                }
            ]
        }
    ]
}
Read also: Laravel 9 Many To Many Polymorphic Relationship Example
Conclusion
Now we know laravel multi-level relationship. Hope this nested with laravel tutorial will help you to create laravel eager loading multiple relationships.