
There is a composer package for laravel called kyslik/column-sortable and using this package, we can easily make table column sorting. This kyslik/column-sortable package provide us an easy way to sort table column in laravel application. So in this tutorial, I will show you how we can use this kyslik/column-sortable to create a table column sorting example in laravel 9 application.
You know that, jQuery datatable or yajra datatable provides us with default column sorting. But assume we are going to make a simple data table list and you need to create a column sorting with this table. Then this kyslik/column-sortable package is for you. Now you will see the example use case of kyslikcolumn sortable laravel 9.
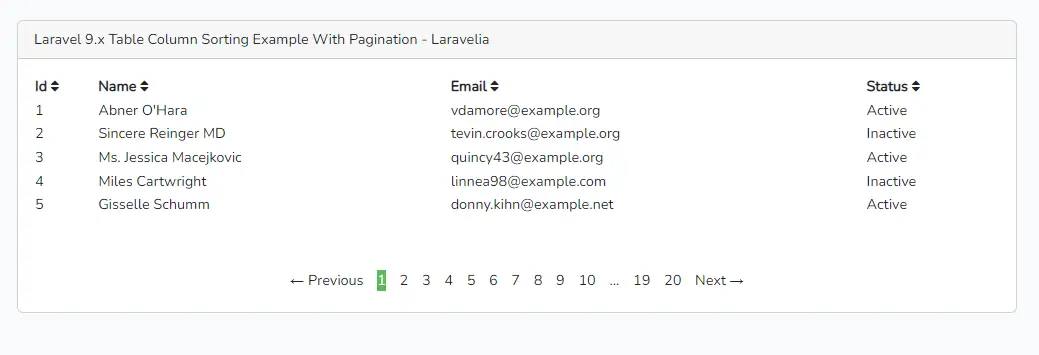
Let's see the example of laravel table pagination:
Preview Laravel Table Column Sorting With Pagination
Step 1: Install Laravel
First of all, we need to get a fresh Laravel 9 version application using the bellow command, So open your terminal OR command prompt and run the bellow command to start laravel column sorting.
composer create-project laravel/laravel example-app
Step 2: Connect Database
After successfully installing the laravel app and then configuring the database setup. We will open the ".env" file and change the database name, username and password in the env file to create kyslikcolumn sortable laravel 9.
.env
DB_CONNECTION=mysql
DB_HOST=127.0.0.1
DB_PORT=3306
DB_DATABASE=Enter_Your_Database_Name
DB_USERNAME=Enter_Your_Database_Username
DB_PASSWORD=Enter_Your_Database_Password
Read also: Laravel 9 Pagination With Search Example
Step 3: Create Migration and Model
In this step, we need to create users table and model. then we need to run a migration. so let's change the files.
database/migrations/create_users_table.php
<?php

use Illuminate\Database\Migrations\Migration;
use Illuminate\Database\Schema\Blueprint;
use Illuminate\Support\Facades\Schema;

return new class extends Migration
{
    /**
     * Run the migrations.
     *
     * @return void
     */
    public function up()
    {
        Schema::create('users', function (Blueprint $table) {
            $table->id();
            $table->string('name');
            $table->string('email')->unique();
            $table->timestamp('email_verified_at')->nullable();
            $table->string('password');
            $table->string('status')->nullable()->default(false);
            $table->rememberToken();
            $table->timestamps();
        });
    }

    /**
     * Reverse the migrations.
     *
     * @return void
     */
    public function down()
    {
        Schema::dropIfExists('users');
    }
};
Now you have to run this migration by following the command:
php artisan migrate
Now update the seeder class like below:
Database\Seeders\DatabaseSeeder.php
<?php

namespace Database\Seeders;

use App\Models\Post;
use App\Models\User;
use Illuminate\Support\Str;
use Illuminate\Database\Seeder;
use Illuminate\Database\Console\Seeds\WithoutModelEvents;

class DatabaseSeeder extends Seeder
{
    public function run()
    {
        for ($i=0; $i < 100; $i++) {
            User::create([
                'name' => fake()->name(),
                'email' => fake()->unique()->safeEmail(),
                'email_verified_at' => now(),
                'password' => '$2y$10$92IXUNpkjO0rOQ5byMi.Ye4oKoEa3Ro9llC/.og/at2.uheWG/igi',
                'remember_token' => Str::random(10),
                'status' => $i % 2 === 0 ? 'active' : 'inactive'
            ]);
        }
    }
}
Now run the below command to insert some dummy data.
php artisan db:seed
Read also: Laravel 9 Cursor Pagination Example
Step 4: Install Package
Now, I will install kyslik/column-sortable package for sorting table data in laravel. So open your terminal and run bellow command:
composer require kyslik/column-sortable
After successfully installing the package, you have to open the config/app.php file and add the service provider and alias.
config/app.php
<?php

'providers' => [
	....
	Kyslik\ColumnSortable\ColumnSortableServiceProvider::class,
]
Now you can publish the configuration service like:
php artisan vendor:publish --provider="Kyslik\ColumnSortable\ColumnSortableServiceProvider" --tag="config"
Step 5: Update User Model
Now in this step, we have to update the user model with the following code. So update it like this:
app/Models/User.php
<?php

namespace App\Models;

use Laravel\Sanctum\HasApiTokens;
use Kyslik\ColumnSortable\Sortable;
use Illuminate\Notifications\Notifiable;
use Illuminate\Contracts\Auth\MustVerifyEmail;
use Illuminate\Database\Eloquent\Factories\HasFactory;
use Illuminate\Database\Eloquent\Relations\HasMany;
use Illuminate\Foundation\Auth\User as Authenticatable;

class User extends Authenticatable implements MustVerifyEmail
{
    use HasApiTokens, HasFactory, Notifiable, Sortable;

	public $sortable = ['id', 'name', 'email', 'status'];
}
Step 6: Create Route
Here, we need to add one more route to display the users data to create laravel sortby with pagination. so let's add that route in the web.php file.
routes/web.php
<?php

use Illuminate\Support\Facades\Route;
use App\Http\Controllers\TutorialController;

/*
|--------------------------------------------------------------------------
| Web Routes
|--------------------------------------------------------------------------
|
| Here is where you can register web routes for your application. These
| routes are loaded by the RouteServiceProvider within a group which
| contains the "web" middleware group. Now create something great!
|
*/

Route::get('/', [TutorialController::class,'index'])->name('search');
Step 7: Create Controller
Here, we need to add the index() method for fetching users data for laravel pagination sorting in TutorialController. so let's add like as below:
app/Http/Controllers/TutorialController.php
<?php

namespace App\Http\Controllers;

use App\Models\User;
use Illuminate\Http\Request;

class TutorialController extends Controller
{
    public function index(Request $request)
    {
    	$users = User::sortable()
                    ->paginate(5);

    	return view('welcome',compact('users'));
    }
}
Step 8: Create Blade file
In this step, we need to create a welcome blade file and update it like this. so let's change it.
resources/views/welcome.blade.php
@extends('layouts.app')

@push('style')
<link href="https://maxcdn.bootstrapcdn.com/font-awesome/4.7.0/css/font-awesome.min.css" rel="stylesheet">
<style type="text/css">
    .my-active span{
        background-color: #5cb85c !important;
        color: white !important;
        border-color: #5cb85c !important;
    }
    ul.pager>li {
        display: inline-flex;
        padding: 5px;
    }
</style>
@endpush
@section('content')
<div class="container">
    <div class="row justify-content-center">
        <div class="col-md-8">
            <div class="card">
                <div class="card-header">Laravel 9.x Table Column Sorting Example With Pagination - Laravelia</div>
                 <div class="card-body">
                    <table style="width: 100%">
                        <thead>
                            <th>@sortablelink('id')</th>
                            <th>@sortablelink('name')</th>
                            <th>@sortablelink('email')</th>
                            <th>@sortablelink('status')</th>
                        </thead>
                        <tbody>
                            @foreach($users as $user)
                            <tr>
                                <td>{{ $loop->index + 1 }}</td>
                                <td>{{ $user->name }}</td>
                                <td>{{ $user->email }}</td>
                                <td>{{ $user->status == 'active' ? 'Active' : 'Inactive'}}</td>
                            </tr>
                            @endforeach
                        </tbody>
                    </table>
                    <center class="mt-5">
                        {{  $users->withQueryString()->links() }}
                    </center>
                </div>
            </div>
        </div>
    </div>
</div>
@endsection
Now create an app blade file and update it like this:
resources/views/layouts/app.blade.php
<!doctype html>
<html lang="{{ str_replace('_', '-', app()->getLocale()) }}">
<head>
    <meta charset="utf-8">
    <meta name="viewport" content="width=device-width, initial-scale=1">

    <!-- CSRF Token -->
    <meta name="csrf-token" content="{{ csrf_token() }}">

    <title>{{ config('app.name', 'Laravel') }}</title>

    <!-- Tailwindcss -->
    <script src="https://cdn.tailwindcss.com"></script>

    <!-- Scripts -->
    @vite(['resources/sass/app.scss', 'resources/js/app.js'])
    @stack('style')
</head>
<body>
    <div id="app">
        <nav class="navbar navbar-expand-md navbar-light bg-white shadow-sm">
            <div class="container">
                <a class="navbar-brand" href="{{ url('/') }}">
                    Laravelia
                </a>
                <button class="navbar-toggler" type="button" data-bs-toggle="collapse" data-bs-target="#navbarSupportedContent" aria-controls="navbarSupportedContent" aria-expanded="false" aria-label="{{ __('Toggle navigation') }}">
                    <span class="navbar-toggler-icon"></span>
                </button>

                <div class="collapse navbar-collapse" id="navbarSupportedContent">
                    <!-- Left Side Of Navbar -->
                    <ul class="navbar-nav me-auto">

                    </ul>

                    <!-- Right Side Of Navbar -->
                    <ul class="navbar-nav ms-auto">
                        <!-- Authentication Links -->
                        @guest
                            @if (Route::has('login'))
                                <li class="nav-item">
                                    <a class="nav-link" href="{{ route('login') }}">{{ __('Login') }}</a>
                                </li>
                            @endif

                            @if (Route::has('register'))
                                <li class="nav-item">
                                    <a class="nav-link" href="{{ route('register') }}">{{ __('Register') }}</a>
                                </li>
                            @endif
                        @else
                            <li class="nav-item dropdown">
                                <a id="navbarDropdown" class="nav-link dropdown-toggle" href="#" role="button" data-bs-toggle="dropdown" aria-haspopup="true" aria-expanded="false" v-pre>
                                    {{ Auth::user()->name }}
                                </a>

                                <div class="dropdown-menu dropdown-menu-end" aria-labelledby="navbarDropdown">
                                    <a class="dropdown-item" href="{{ route('logout') }}"
                                       onclick="event.preventDefault();
                                                     document.getElementById('logout-form').submit();">
                                        {{ __('Logout') }}
                                    </a>

                                    <form id="logout-form" action="{{ route('logout') }}" method="POST" class="d-none">
                                        @csrf
                                    </form>
                                </div>
                            </li>
                        @endguest
                    </ul>
                </div>
            </div>
        </nav>

        <main class="py-4">
            @yield('content')
        </main>
    </div>
    @stack('script')
</body>
</html>
Read also: How To Create Pagination From Laravel Collection?
Ok, now we are ready to go and test laravel table sorting tutorial. So let's run the project using this command:
php artisan serve
Now you can test our application by visiting the below URL:
URL
Conclusion
Now we know sorting table laravel. Hope this laravel table sorting tutorial will help you to create kyslikcolumn sortable laravel 9.