
We can define our own authentication guards in laravel application. We can easily create multiple authentication systems in laravel with different tables with different models. So in this laravel 9 multi auth guard tutorial, I will use a completely separate table from users called doctors and I will create auth system using this Doctor model to make it laravel 9 multi auth with different tables.
So you will learn many things from this tutorial like laravel multiple auth models, laravel custom authentication, laravel auth middleware multiple guards, laravel guard authentication, and finaly how to define guard to create laravel 9 multi auth with different tables.
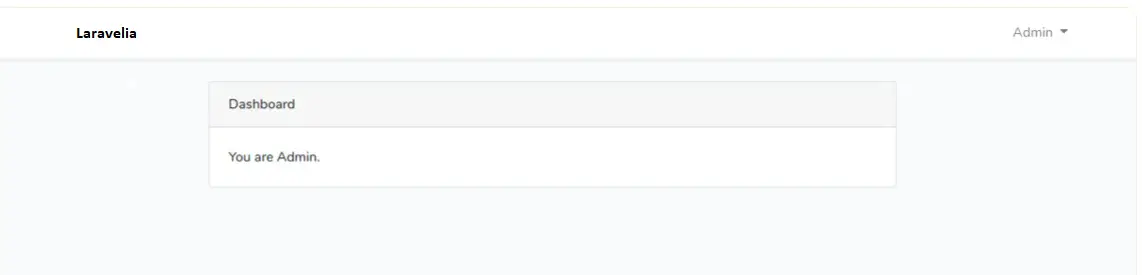
Preview: Login as admin
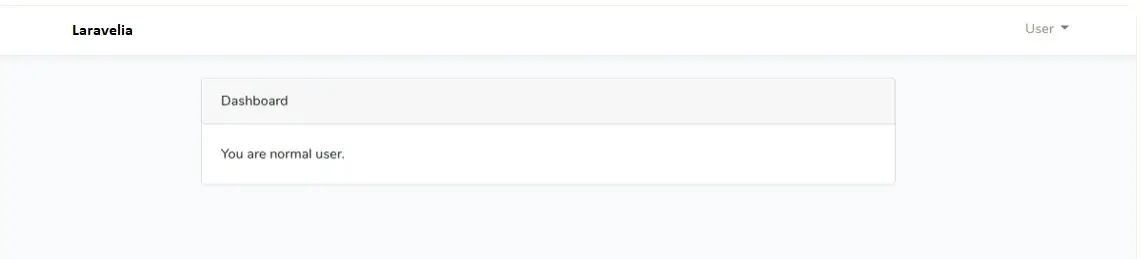
Preview: Login as user
Step 1: Install Laravel
First of all, we need to get a fresh Laravel 9 version application using the bellow command, So open your terminal OR command prompt and run the bellow command to start multiple authentication guard in laravel 9:
composer create-project laravel/laravel example-app
Step 2: Setup Database
After successfully installing the laravel app and then configuring the database setup. We will open the ".env" file and change the database name, username and password in the env file.
.env
DB_CONNECTION=mysql
DB_HOST=127.0.0.1
DB_PORT=3306
DB_DATABASE=Enter_Your_Database_Name
DB_USERNAME=Enter_Your_Database_Username
DB_PASSWORD=Enter_Your_Database_Password
Read also: Laravel 9 Firebase Phone Number (OTP) Authentication Tutorial
Step 3: Create Model
To create this multiple auth tutorial using guard, we need a separate model Doctor. To create a model and update it like below:
php artisan make:model Doctor -m
And update it like this:
App\Models\Doctor.php
<?php

namespace App\Models;

use Illuminate\Support\Facades\Hash;
use Illuminate\Database\Eloquent\Model;
use Illuminate\Notifications\Notifiable;
use Illuminate\Database\Eloquent\Factories\HasFactory;
use Illuminate\Foundation\Auth\User as Authenticatable;

class Doctor extends Authenticatable
{
    use HasFactory, Notifiable;

    protected $guarded = [];

    public function setPasswordAttribute($value)
    {
        $this->attributes['password'] = Hash::make($value);
    }

    public function scopeIsActive($query)
    {
        return $query->where('is_active',1);
    }
}
And in the migrations file, paste this below code.
<?php

use Illuminate\Database\Migrations\Migration;
use Illuminate\Database\Schema\Blueprint;
use Illuminate\Support\Facades\Schema;

return new class extends Migration
{
    /**
     * Run the migrations.
     *
     * @return void
     */
    public function up()
    {
        Schema::create('doctors', function (Blueprint $table) {
            $table->id();
            $table->string('name');
            $table->string('email')->unique();
            $table->timestamp('email_verified_at')->nullable();
            $table->string('password');
            $table->boolean('is_active')->default(true);
            $table->rememberToken();
            $table->timestamps();
        });
    }

    /**
     * Reverse the migrations.
     *
     * @return void
     */
    public function down()
    {
        Schema::dropIfExists('doctors');
    }
};
Step 2 : Configure Custom Guard
In this step, we need to create our custom guard name in the auth.php file. So visit config/auth.php and create your own guard name as many as you want.
config/auth.php
<?php

return [

    /*
    |--------------------------------------------------------------------------
    | Authentication Defaults
    |--------------------------------------------------------------------------
    |
    | This option controls the default authentication "guard" and password
    | reset options for your application. You may change these defaults
    | as required, but they're a perfect start for most applications.
    |
    */

    'defaults' => [
        'guard' => 'web',
        'passwords' => 'users',
    ],

    /*
    |--------------------------------------------------------------------------
    | Authentication Guards
    |--------------------------------------------------------------------------
    |
    | Next, you may define every authentication guard for your application.
    | Of course, a great default configuration has been defined for you
    | here which uses session storage and the Eloquent user provider.
    |
    | All authentication drivers have a user provider. This defines how the
    | users are actually retrieved out of your database or other storage
    | mechanisms used by this application to persist your user's data.
    |
    | Supported: "session", "token"
    |
    */

    'guards' => [
        'web' => [
            'driver' => 'session',
            'provider' => 'users',
        ],

        'doctor' => [
            'driver' => 'session',
            'provider' => 'doctors',
        ],

        'api' => [
            'driver' => 'token',
            'provider' => 'users',
            'hash' => false,
        ],
    ],

    /*
    |--------------------------------------------------------------------------
    | User Providers
    |--------------------------------------------------------------------------
    |
    | All authentication drivers have a user provider. This defines how the
    | users are actually retrieved out of your database or other storage
    | mechanisms used by this application to persist your user's data.
    |
    | If you have multiple user tables or models you may configure multiple
    | sources which represent each model / table. These sources may then
    | be assigned to any extra authentication guards you have defined.
    |
    | Supported: "database", "eloquent"
    |
    */

    'providers' => [
        'users' => [
            'driver' => 'eloquent',
            'model' => App\Models\User::class,
        ],
        'doctors' => [
            'driver' => 'eloquent',
            'model' => App\Models\Doctor::class,
        ],

        // 'users' => [
        //     'driver' => 'database',
        //     'table' => 'users',
        // ],
    ],

    /*
    |--------------------------------------------------------------------------
    | Resetting Passwords
    |--------------------------------------------------------------------------
    |
    | You may specify multiple password reset configurations if you have more
    | than one user table or model in the application and you want to have
    | separate password reset settings based on the specific user types.
    |
    | The expire time is the number of minutes that the reset token should be
    | considered valid. This security feature keeps tokens short-lived so
    | they have less time to be guessed. You may change this as needed.
    |
    */

    'passwords' => [
        'users' => [
            'provider' => 'users',
            'table' => 'password_resets',
            'expire' => 60,
            'throttle' => 60,
        ],
        'doctors' => [
            'provider' => 'doctors',
            'table' => 'password_resets',
            'expire' => 60,
            'throttle' => 60,
        ],
    ],

    /*
    |--------------------------------------------------------------------------
    | Password Confirmation Timeout
    |--------------------------------------------------------------------------
    |
    | Here you may define the amount of seconds before a password confirmation
    | times out and the user is prompted to re-enter their password via the
    | confirmation screen. By default, the timeout lasts for three hours.
    |
    */

    'password_timeout' => 10800,

];
Step 3: Create Route
Now in this step, we have to create our route for creating Laravel multi auth using guard. Let's create our route.
routes/web.php
<?php

use Illuminate\Support\Facades\Route;
use Illuminate\Support\Facades\Auth;
use App\Http\Controllers\Doctor\Auth\LoginController;

Route::name('doctor.')->namespace('Doctor')->prefix('doctor')->group(function(){
    Route::namespace('Auth')->middleware('guest:doctor')->group(function(){
        //login route
        Route::get('/login',[LoginController::class,'login'])->name('login');
        Route::post('/login',[LoginController::class,'processLogin']);
    });
    Route::namespace('Auth')->middleware('auth:doctor')->group(function(){
        Route::post('/logout',function(){
            Auth::guard('doctor')->logout();
            return redirect()->action([
                LoginController::class,
                'login'
            ]);
        })->name('logout');
    });
});
Now we have to define our custom route path from the route service provider. So change it like below.
App\Providers\RouteServiceProvider.php
<?php

namespace App\Providers;

use Illuminate\Cache\RateLimiting\Limit;
use Illuminate\Foundation\Support\Providers\RouteServiceProvider as ServiceProvider;
use Illuminate\Http\Request;
use Illuminate\Support\Facades\RateLimiter;
use Illuminate\Support\Facades\Route;

class RouteServiceProvider extends ServiceProvider
{
    public const HOME = '/home';

    public const DOCTOR = '/doctor/home';

    public function boot()
    {
        $this->configureRateLimiting();

        $this->routes(function () {
            Route::middleware('api')
                ->prefix('api')
                ->group(base_path('routes/api.php'));

            Route::middleware('web')
                ->group(base_path('routes/web.php'));
        });
    }

    protected function configureRateLimiting()
    {
        RateLimiter::for('api', function (Request $request) {
            return Limit::perMinute(60)->by($request->user()?->id ?: $request->ip());
        });
    }
}
Step 4: Create Controller
Now in this step, we need to create our login controller and method which are defined in the doctor.php route. So let's create that method.
App\Http\Controllers\Doctor\Auth\LoginController.php
<?php

namespace App\Http\Controllers\Doctor\Auth;

use Illuminate\Http\Request;
use Facades\App\Helper\Helper;
use App\Http\Requests\LoginRequest;
use App\Http\Controllers\Controller;
use App\Models\Doctor;
use Illuminate\Support\Facades\Auth;
use Illuminate\Support\Facades\View;
use App\Providers\RouteServiceProvider;
use Symfony\Component\HttpFoundation\Response;

class LoginController extends Controller
{
    public function login()
    {
        if(View::exists('doctor.auth.login'))
        {
            return view('doctor.auth.login');
        }
        abort(Response::HTTP_NOT_FOUND);
    }

    public function processLogin(Request $request)
    {
        $credentials = $request->except(['_token']);

        if(isDoctorActive($request->email))
        {
            if(Auth::guard('doctor')->attempt($credentials))
            {
                return redirect(RouteServiceProvider::DOCTOR);
            }
            return redirect()->action([
                LoginController::class,
                'login'
            ])->with('message','Credentials not matced in our records!');
        }
        return redirect()->action([
            LoginController::class,
            'login'
        ])->with('message','You are not an active doctors!');
    }
}
Now create a helper and paste this into your helper.php file.
app\helper.php
use App\Models\Doctor;

if(!function_exists('isDoctorActive'))
{
    function isDoctorActive($email) : bool
    {
        $doctor = Doctor::whereEmail($email)->isActive()->exists();

        return $doctor ? true : false;
    }
}
Read also: Laravel 9 Email Based Two Factor (2FA) Authentication
Step 5: Create Blade
Now we need to paste this HTML code in the following path to create multiple login systems in Laravel 9 using custom guard.
resources/views/doctor/auth/login.blade.php
@extends('layouts.app')

@section('content')
<div class="container">
    <div class="row justify-content-center">
        <div class="col-md-8">
            <div class="card">
                <div class="card-header">{{ __('Doctor Login') }}</div>
                @if(session()->has('message'))
                    <span>{{ session()->get('message') }}</span>
                @endif
                <div class="card-body">
                    <form method="POST" action="{{ route('doctor.login') }}">
                        @csrf

                        <div class="form-group row">
                            <label for="email" class="col-md-4 col-form-label text-md-right">{{ __('E-Mail Address') }}</label>

                            <div class="col-md-6">
                                <input id="email" type="email" class="form-control @error('email') is-invalid @enderror" name="email" value="{{ old('email') }}" required autocomplete="email" autofocus>

                                @error('email')
                                    <span class="invalid-feedback" role="alert">
                                        <strong>{{ $message }}</strong>
                                    </span>
                                @enderror
                            </div>
                        </div>

                        <div class="form-group row">
                            <label for="password" class="col-md-4 col-form-label text-md-right">{{ __('Password') }}</label>

                            <div class="col-md-6">
                                <input id="password" type="password" class="form-control @error('password') is-invalid @enderror" name="password" required autocomplete="current-password">

                                @error('password')
                                    <span class="invalid-feedback" role="alert">
                                        <strong>{{ $message }}</strong>
                                    </span>
                                @enderror
                            </div>
                        </div>

                        <div class="form-group row">
                            <div class="col-md-6 offset-md-4">
                                <div class="form-check">
                                    <input class="form-check-input" type="checkbox" name="remember" id="remember" {{ old('remember') ? 'checked' : '' }}>

                                    <label class="form-check-label" for="remember">
                                        {{ __('Remember Me') }}
                                    </label>
                                </div>
                            </div>
                        </div>

                        <div class="form-group row mb-0">
                            <div class="col-md-8 offset-md-4">
                                <button type="submit" class="btn btn-primary">
                                    {{ __('Login') }}
                                </button>

                                @if (Route::has('password.request'))
                                    <a class="btn btn-link" href="{{ route('password.request') }}">
                                        {{ __('Forgot Your Password?') }}
                                    </a>
                                @endif
                            </div>
                        </div>
                    </form>
                </div>
            </div>
        </div>
    </div>
</div>
@endsection
for logout, use this route and form
<a class="dropdown-item" href="{{ route('doctor.logout') }}" onclick="event.preventDefault();
  document.getElementById('logout-form').submit();">
  {{ __('Logout') }}
</a>

<form id="logout-form" action="{{ route('doctor.logout') }}" method="POST" class="d-none">
   @csrf
</form>
Ok, now we are ready to go and test our custom login system with the guard example in laravel. So let's run the project using this command:
php artisan serve
Now you can test our application by visiting the below URL:
URL
Read also: Laravel 9 SMS Based Two Factor (2FA) Authentication
Conclusion
Now we know laravel multi auth with guard. Hope this laravel multi authentication tutorial will help you to create your own custom multiple authentication system in laravel.