
I have already create two tutorial on laravel two factor authentication system with sms and another is laravel two factor authentication system with email. But in this laravel google two factor authentication tutorial, I will show you a complete guide on laravel google 2fa authentication.
We can easily use Google 2FA Authenticator in laravel App. Cause there is a package pragmarx/google2fa-laravel and using this package, we can easily implement the google 2FA login system in laravel application. In this tutorial, I will show you step by step how to add two factor authentication using google authenticator in laravel web application.
Google2FA is a PHP implementation of the Google Two-Factor Authentication Module, which supports the HMAC-Based One-time Password (HOTP) algorithm specified in RFC 4226 and the Time-based One-time Password (TOTP) algorithm specified in RFC 6238.
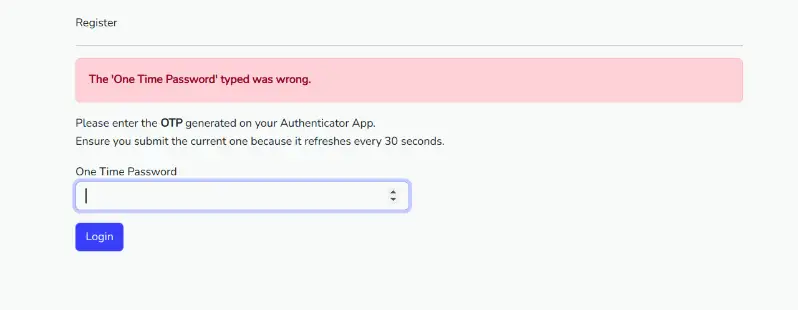
Login Page
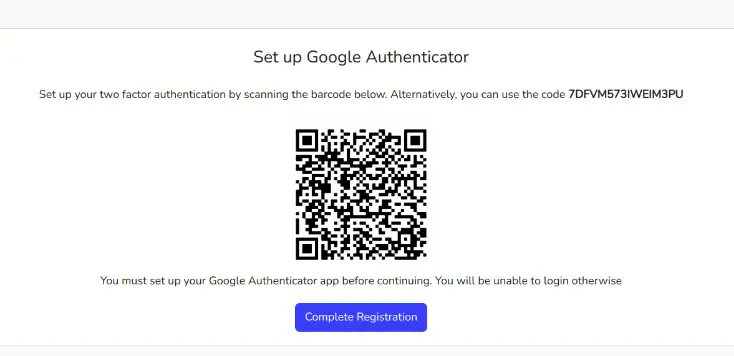
QR Scan for Google 2FA
Step 1: Install Laravel
First of all, we need to get a fresh Laravel 9 version application using the bellow command, So open your terminal OR command prompt and run the bellow command to start google 2fa login system laravel:
composer create-project laravel/laravel example-app
Step 2: Setup Database
After successfully installing the laravel app and then configuring the database setup. We will open the ".env" file and change the database name, username and password in the env file.
.env
DB_CONNECTION=mysql
DB_HOST=127.0.0.1
DB_PORT=3306
DB_DATABASE=Enter_Your_Database_Name
DB_USERNAME=Enter_Your_Database_Username
DB_PASSWORD=Enter_Your_Database_Password
Read also: Laravel 9 Email Based Two Factor (2FA) Authentication
Step 3: Create Auth Scaffold
Here, we will use laravel ui package and create auth scaffold with the bootstrap framework. let's follow bellow command:
composer require laravel/ui
Now create a simple bootstrap auth system by the below command:
php artisan ui bootstrap --auth
Step 4: Install Google Two-Factor Authentication Package
In this step, I will install pragmarx/google2fa-laravel and bacon/bacon-qr-code for google authentication. So let's run the below command:
composer require pragmarx/google2fa-laravel
composer require bacon/bacon-qr-code
Next, we can publish the configuration file, so let's run the below command:
php artisan vendor:publish --provider="PragmaRX\Google2FALaravel\ServiceProvider"
Step 5: Create 2fa Custom Middleware
Now, we will add "2fa" middleware in the Kernel.php file. 2fa middleware added by google2fa-laravel composer package. So let's register it.
app/Http/Kernel.php
<?php

namespace App\Http;

use Illuminate\Foundation\Http\Kernel as HttpKernel;

class Kernel extends HttpKernel
{
    ...
    ...
    /**
     * The application's route middleware.
     *
     * These middleware may be assigned to groups or used individually.
     *
     * @var array

     */
    protected $routeMiddleware = [
        ...
        '2fa' => \PragmaRX\Google2FALaravel\Middleware::class,
    ];

}
Step 6: Create Migration
Here, we have to create a new migration to add "google2fa_secret" column in the users table using the Laravel php artisan command, so first fire the bellow command:
php artisan make:migration add_google_2fa_columns
After this command, We will find this newly create migration file in the following path "database/migrations" and you have to put the below code in your migration file.
<?php

use Illuminate\Database\Migrations\Migration;
use Illuminate\Database\Schema\Blueprint;
use Illuminate\Support\Facades\Schema;

return new class extends Migration
{
    /**
     * Run the migrations.
     *
     * @return void
     */
    public function up()
    {
        Schema::table('users', function (Blueprint $table) {
            $table->text('google2fa_secret')->nullable();
        });
    }

    /**
     * Reverse the migrations.
     *
     * @return void
     */
    public function down()
    {

    }
};
Step 7: Update Model
In this step, we will update the User model file. so let's update as the below:
app/Models/User.php
<?php

namespace App\Models;

use Illuminate\Database\Eloquent\Factories\HasFactory;
use Illuminate\Foundation\Auth\User as Authenticatable;
use Illuminate\Notifications\Notifiable;
use Laravel\Sanctum\HasApiTokens;
use Illuminate\Database\Eloquent\Casts\Attribute;

class User extends Authenticatable
{
    use HasApiTokens, HasFactory, Notifiable;

    /**
     * The attributes that are mass assignable.
     *
     * @var array

     */
    protected $fillable = [
        'name',
        'email',
        'password',
        'google2fa_secret'
    ];

    /**
     * The attributes that should be hidden for serialization.
     *
     * @var array

     */
    protected $hidden = [
        'password',
        'remember_token',
    ];

    /**
     * The attributes that should be cast.
     *
     * @var array

     */
    protected $casts = [
        'email_verified_at' => 'datetime',
    ];

    /**
     * Interact with the user's first name.
     *
     * @param  string  $value
     * @return \Illuminate\Database\Eloquent\Casts\Attribute
     */
    protected function google2faSecret(): Attribute
    {
        return new Attribute(
            get: fn ($value) =>  decrypt($value),
            set: fn ($value) =>  encrypt($value),
        );
    }
}
Step 8: Create Routes
In this step, add a new route to that file.
routes/web.php
<?php

use Illuminate\Support\Facades\Route;

use App\Http\Controllers\Auth\RegisterController;
use App\Http\Controllers\HomeController;

/*
|--------------------------------------------------------------------------
| Web Routes
|--------------------------------------------------------------------------
|
| Here is where you can register web routes for your application. These
| routes are loaded by the RouteServiceProvider within a group which
| contains the "web" middleware group. Now create something great!
|
*/

Route::get('/', function () {
    return view('welcome');
});

Auth::routes();

Route::middleware(['2fa'])->group(function () {
    Route::get('/home', [HomeController::class, 'index'])->name('home');
    Route::post('/2fa', function () {
        return redirect(route('home'));
    })->name('2fa');
});

Route::get('/complete-registration', [RegisterController::class, 'completeRegistration'])
   ->name('complete.registration');
Step 9: Update Controller
In this step, now we have to need to update RegisterController, So let's create a controller:
app/Http/Controllers/Auth/RegisterController.php
<?php

namespace App\Http\Controllers\Auth;

use App\Http\Controllers\Controller;
use App\Providers\RouteServiceProvider;
use App\Models\User;
use Illuminate\Foundation\Auth\RegistersUsers;
use Illuminate\Support\Facades\Hash;
use Illuminate\Support\Facades\Validator;
use Illuminate\Http\Request;

class RegisterController extends Controller
{

    use RegistersUsers {
        register as registration;
    }

    protected $redirectTo = '/home';

    public function __construct()
    {
        $this->middleware('guest');
    }

    protected function validator(array $data)
    {
        return Validator::make($data, [
            'name' => ['required', 'string', 'max:255'],
            'email' => ['required', 'string', 'email', 'max:255', 'unique:users'],
            'password' => ['required', 'string', 'min:6', 'confirmed'],
        ]);
    }

    protected function create(array $data)
    {
        return User::create([
            'name' => $data['name'],
            'email' => $data['email'],
            'password' => Hash::make($data['password']),
            'google2fa_secret' => $data['google2fa_secret'],
        ]);
    }

    public function register(Request $request)
    {
        $this->validator($request->all())->validate();

        $google2fa = app('pragmarx.google2fa');
        $registration_data = $request->all();
        $registration_data["google2fa_secret"] = $google2fa->generateSecretKey();
        $request->session()->flash('registration_data', $registration_data);

        $QR_Image = $google2fa->getQRCodeInline(
            config('app.name'),
            $registration_data['email'],
            $registration_data['google2fa_secret']
        );

        return view('google2fa.register', ['QR_Image' => $QR_Image, 'secret' => $registration_data['google2fa_secret']]);
    }

    public function completeRegistration(Request $request)
    {
        $request->merge(session('registration_data'));

        return $this->registration($request);
    }
}
Step 10: Create Blade File
In this step, we need two blade files with index.blade.php and register.blade.php files in google2fa, so let's update the following code on it:
resources/views/google2fa/index.blade.php
@extends('layouts.app')

@section('content')
<div class="container">
    <div class="row justify-content-center align-items-center " style="height: 70vh;S">
        <div class="col-md-8 col-md-offset-2">
            <div class="panel panel-default">
                <div class="panel-heading font-weight-bold">Register</div>
                <hr>
                @if($errors->any())
                    <div class="col-md-12">
                        <div class="alert alert-danger">
                          <strong>{{$errors->first()}}</strong>
                        </div>
                    </div>
                @endif

                <div class="panel-body">
                    <form class="form-horizontal" method="POST" action="{{ route('2fa') }}">
                        {{ csrf_field() }}

                        <div class="form-group">
                            <p>Please enter the  <strong>OTP</strong> generated on your Authenticator App. <br> Ensure you submit the current one because it refreshes every 30 seconds.</p>
                            <label for="one_time_password" class="col-md-4 control-label">One Time Password</label>

                            <div class="col-md-6">
                                <input id="one_time_password" type="number" class="form-control" name="one_time_password" required autofocus>
                            </div>
                        </div>

                        <div class="form-group">
                            <div class="col-md-6 col-md-offset-4 mt-3">
                                <button type="submit" class="btn btn-primary">
                                    Login
                                </button>
                            </div>
                        </div>
                    </form>
                </div>
            </div>
        </div>
    </div>
</div>
@endsection
Now update the register page with the following code:
resources/views/google2fa/register.blade.php
@extends('layouts.app')

@section('content')
<div class="container">
    <div class="row">
        <div class="col-md-12 mt-4">
            <div class="card card-default">
                <h4 class="card-heading text-center mt-4">Set up Google Authenticator</h4>

                <div class="card-body" style="text-align: center;">
                    <p>Set up your two factor authentication by scanning the barcode below. Alternatively, you can use the code <strong>{{ $secret }}</strong></p>
                    <div>
                        {!! $QR_Image !!}
                    </div>
                    <p>You must set up your Google Authenticator app before continuing. You will be unable to login otherwise</p>
                    <div>
                        <a href="{{ route('complete.registration') }}" class="btn btn-primary">Complete Registration</a>
                    </div>
                </div>
            </div>
        </div>
    </div>
</div>
@endsection
Ok, now we are ready to go and test our custom google two-factor authentication system in laravel. So let's run the project using this command:
php artisan serve
Now you can test our application by visiting the below URL:
URL
Read also: Laravel 9 SMS Based Two Factor (2FA) Authentication
Conclusion
Now we know laravel google2fa and how to add google authenticator in laravel. Hope this laravel google two factor authentication tutorial will help you to create your google authenticator in laravel. Hope this two factor authentication using google authenticator in laravel tutorial is help you to solve your problem.