
Laravel by default provides two types of API authentication. One is the sanctum authentication and another is the passport authentication. The question is when we will use the passport and when we will use sanctum authentication. First of all, we have to know how Laravel Passport and Sanctum work. The Laravel Passport provides a full OAuth2 server implementation for our Laravel application. Passport is built on top of the League OAuth2 server for the Laravel application.
So the answer is clear now when we will use Laravel passport. If our application absolutely needs to support OAuth2, then we should use Laravel Passport.
In this Laravel passport tutorial, I will show you the complete Laravel passport API authentication using Laravel version 10. So you will learn how to use the Laravel passport oauth2 example in the Laravel application. There are a few steps we have to follow before completing Laravel 10 passport authentication. Let's start with how to use Passport authentication in Laravel.
Step 1: Install Laravel 10
First of all, we need to get a fresh Laravel 10 version application using the bellow command to start laravel passport example.
composer create-project laravel/laravel example-app
Step 2: Connect Database
I am going to use the MYSQL database for this laravel passport api authentication. So connect the database by updating.env like this:
.env
DB_CONNECTION=mysql
DB_HOST=127.0.0.1
DB_PORT=3306
DB_DATABASE=YOUR_DB_NAME
DB_USERNAME=YOUR_DB_USERNAME
DB_PASSWORD=YOUR_DB_PASSWORD
Step 3: Install & Configure Passport
To get started with Laravel passport, install Passport via the Composer package manager:
composer require laravel/passport
Now run php artisan migrate command to migrate passport related tables.
Next, we have to execute the passport:install Artisan command. This command will create the encryption keys needed to generate secure access tokens
php artisan passport:install
Step 4: Update User Model
By default User model uses HasAPiTokens from the sanctum. Replace it with Laravel Passport like the one below:
app\Models\User.php
<?php

namespace App\Models;

use Laravel\Passport\HasApiTokens;
use Illuminate\Notifications\Notifiable;
use Illuminate\Database\Eloquent\Factories\HasFactory;
use Illuminate\Foundation\Auth\User as Authenticatable;

class User extends Authenticatable
{
    use HasApiTokens, HasFactory, Notifiable;
}
After that, in our application's config/auth.php configuration file, you should define an api authentication guard and set the driver option to passport.
config/auth.php
<?php

return [

    /*
    |--------------------------------------------------------------------------
    | Authentication Defaults
    |--------------------------------------------------------------------------
    |
    | This option controls the default authentication "guard" and password
    | reset options for your application. You may change these defaults
    | as required, but they're a perfect start for most applications.
    |
    */

    'defaults' => [
        'guard' => 'web',
        'passwords' => 'users',
    ],

    /*
    |--------------------------------------------------------------------------
    | Authentication Guards
    |--------------------------------------------------------------------------
    |
    | Next, you may define every authentication guard for your application.
    | Of course, a great default configuration has been defined for you
    | here which uses session storage and the Eloquent user provider.
    |
    | All authentication drivers have a user provider. This defines how the
    | users are actually retrieved out of your database or other storage
    | mechanisms used by this application to persist your user's data.
    |
    | Supported: "session"
    |
    */

    'guards' => [
        'web' => [
            'driver' => 'session',
            'provider' => 'users',
        ]
    ],

    /*
    |--------------------------------------------------------------------------
    | User Providers
    |--------------------------------------------------------------------------
    |
    | All authentication drivers have a user provider. This defines how the
    | users are actually retrieved out of your database or other storage
    | mechanisms used by this application to persist your user's data.
    |
    | If you have multiple user tables or models you may configure multiple
    | sources which represent each model / table. These sources may then
    | be assigned to any extra authentication guards you have defined.
    |
    | Supported: "database", "eloquent"
    |
    */

    'providers' => [
        'users' => [
            'driver' => 'eloquent',
            'model' => App\Models\User::class,
        ],

        'api' => [
            'driver' => 'passport',
            'provider' => 'users',
        ],
    ],

    /*
    |--------------------------------------------------------------------------
    | Resetting Passwords
    |--------------------------------------------------------------------------
    |
    | You may specify multiple password reset configurations if you have more
    | than one user table or model in the application and you want to have
    | separate password reset settings based on the specific user types.
    |
    | The expiry time is the number of minutes that each reset token will be
    | considered valid. This security feature keeps tokens short-lived so
    | they have less time to be guessed. You may change this as needed.
    |
    | The throttle setting is the number of seconds a user must wait before
    | generating more password reset tokens. This prevents the user from
    | quickly generating a very large amount of password reset tokens.
    |
    */

    'passwords' => [
        'users' => [
            'provider' => 'users',
            'table' => 'password_reset_tokens',
            'expire' => 60,
            'throttle' => 60,
        ],
    ],

    /*
    |--------------------------------------------------------------------------
    | Password Confirmation Timeout
    |--------------------------------------------------------------------------
    |
    | Here you may define the amount of seconds before a password confirmation
    | times out and the user is prompted to re-enter their password via the
    | confirmation screen. By default, the timeout lasts for three hours.
    |
    */

    'password_timeout' => 10800,

];
Step 5: Define Route
Here, we need to add routes to create this laravel 10 passport. So update the api routes file like this:
routes/api.php
<?php

use Illuminate\Support\Facades\Route;
use App\Http\Controllers\API\AuthController;

Route::controller(AuthController::class)->group(function () {
    Route::post('login', 'login');
    Route::post('register', 'register');
    Route::post('logout', 'logout');
});
Step 6: Create Controller
Now we have to create AuthController to complete our laravel passport example. So run the below command to create a controller:
php artisan make:controller API/AuthController
Now update this controller like this:
app/Http/Controllers/API/AuthController.php
<?php

namespace App\Http\Controllers\API;

use App\Models\User;
use Illuminate\Http\Request;
use App\Http\Controllers\Controller;
use Illuminate\Support\Facades\Auth;
use Illuminate\Support\Facades\Hash;

class AuthController extends Controller
{
    public function __construct()
    {
        $this->middleware('auth:api', ['except' => ['login', 'register']]);
    }

    public function login(Request $request)
    {
        $credentials = $request->validate([
            'email' => 'required|string|email',
            'password' => 'required|string',
        ]);
        if (auth()->attempt($credentials)) {
            $user = Auth::user();
            $user['token'] = $user->createToken('Laravelia')->accessToken;
            return response()->json([
                'user' => $user
            ], 200);
        }
        return response()->json([
            'message' => 'Invalid credentials'
        ], 402);
    }

    public function register(Request $request)
    {
        $request->validate([
            'name' => 'required|string|max:255',
            'email' => 'required|string|email|max:255|unique:users',
            'password' => 'required|string|min:6',
        ]);

        $user = User::create([
            'name' => $request->name,
            'email' => $request->email,
            'password' => Hash::make($request->password),
        ]);

        return response()->json([
            'message' => 'User created successfully',
            'user' => $user
        ]);
    }

    public function logout()
    {
        Auth::user()->tokens()->delete();
        return response()->json([
            'message' => 'Successfully logged out',
        ]);
    }
}
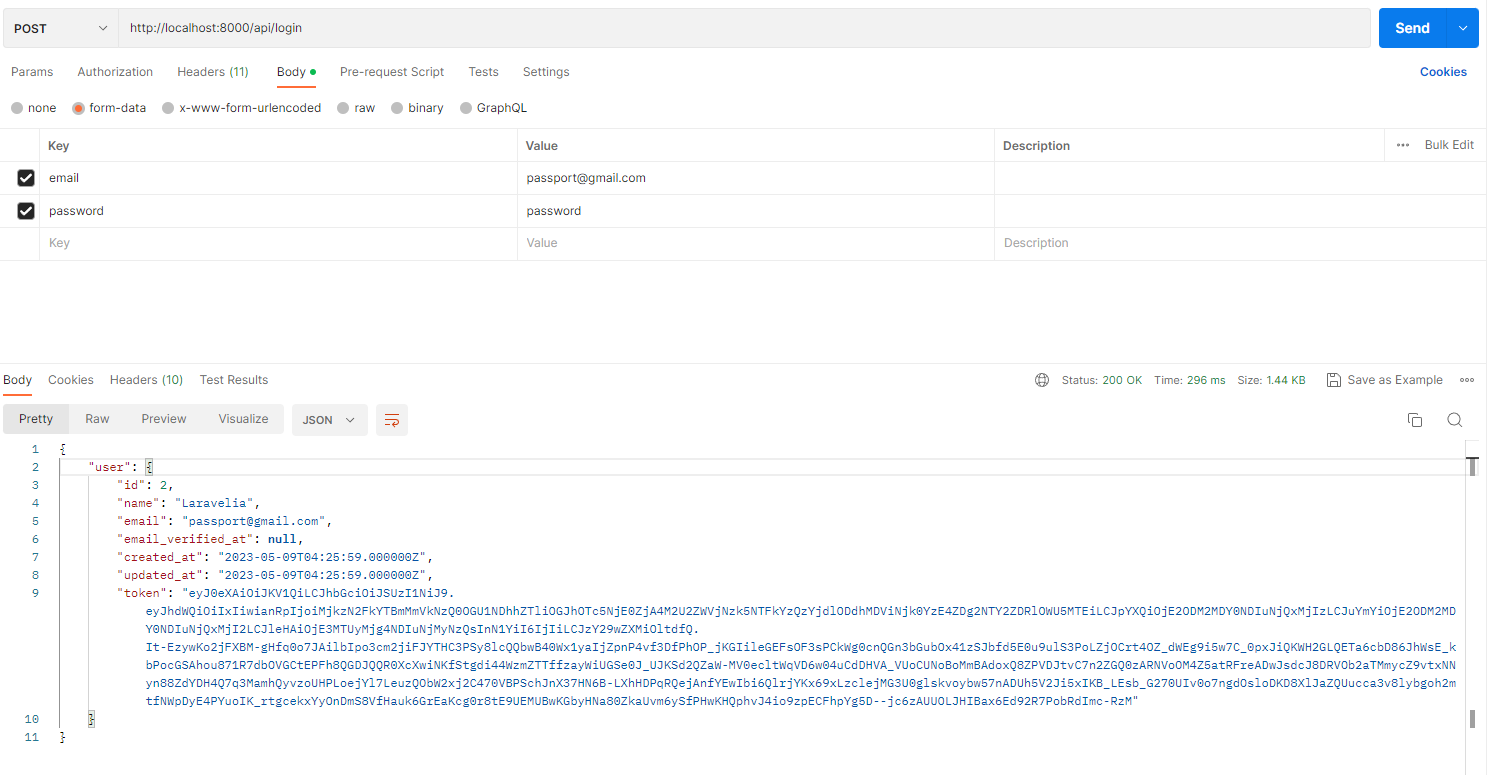
Now if you start your server by running php artisan serve and test all API via Postman like this:
LOGIN API
And now see the Postman output:
Read also: How To Create API With Sanctum Authentication In Laravel 10?
Conclusion
After completing this laravel passport tutorial, hope now you can create this laravel passport api authentication in your laravel 10 application. Hope this how to use Passport authentication in Laravel tutorial will help you.