
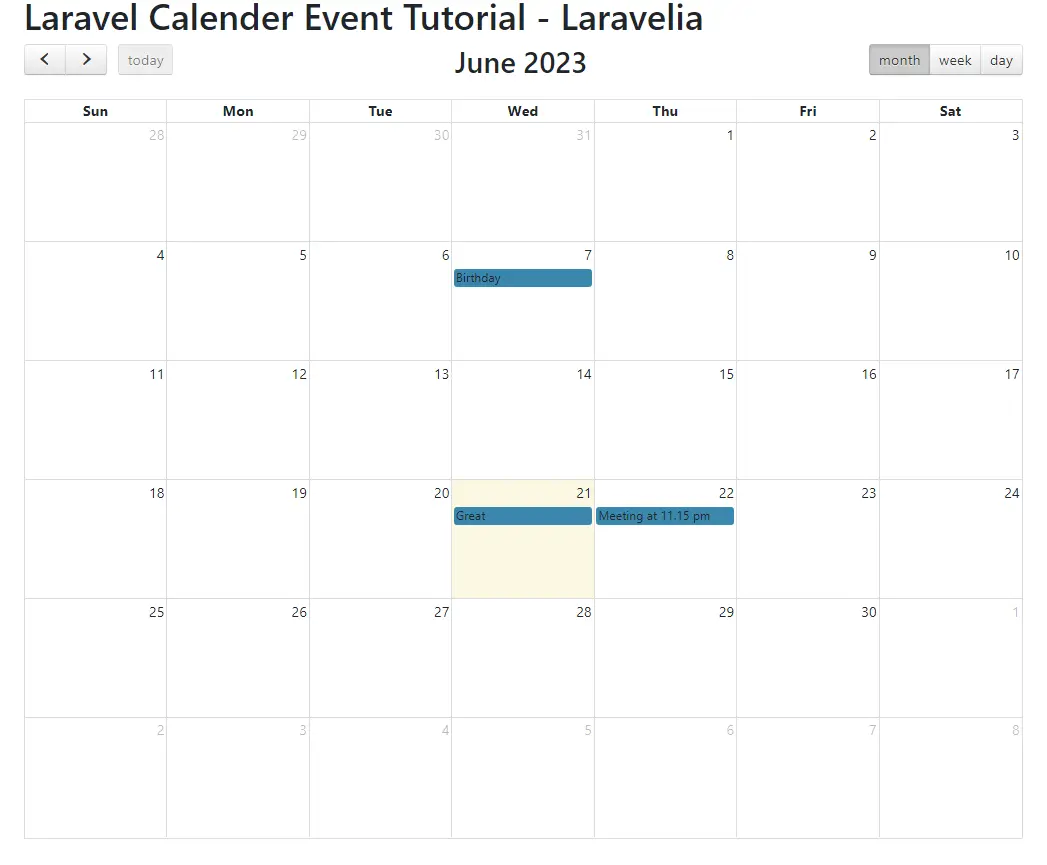
Sometimes we may require to show client events in the calendar in the Laravel application. In this case, we can use a very beautiful jQuery plugin that is fullcalendar js. We can handle create edit and deleting events very easily using this fullcalendar js plugin.
In this tutorial, I will show you how to use this fullcalendar js plugin and handle create delete update events. You will learn Laravel fetch data from database and display in fullcalendar using ajax request. I will use complete ajax to complete this tutorial. I will use also the moment js to format date and show them into calendar.
So if you do not know how to use FullCalendar in laravel 10, then this laravel calendar events tutorial is for you. I will use a complete fresh Laravel installation and show you from scratch.
Step 1: Download Fresh Laravel
In the first step of laravel create calendar event example, download a fresh Laravel application by the following command:
composer create-project laravel/laravel example-app
Step 2: Create Model
In this second step, we need to create migration for the events table using artisan command, so first fire bellow command:
php artisan make:model Event -m
Now update the Event model and migrations file.
App\Models\Event.php
<?php

namespace App\Models;

use Illuminate\Database\Eloquent\Factories\HasFactory;
use Illuminate\Database\Eloquent\Model;

class Event extends Model
{
    use HasFactory;

    protected $fillable = [
        'title',
        'start',
        'end'
    ];
}
Update the events table like
<?php

use Illuminate\Database\Migrations\Migration;
use Illuminate\Database\Schema\Blueprint;
use Illuminate\Support\Facades\Schema;

return new class extends Migration
{
    /**
     * Run the migrations.
     */
    public function up(): void
    {
        Schema::create('events', function (Blueprint $table) {
            $table->id();
            $table->string('title');
            $table->date('start');
            $table->date('end');
            $table->timestamps();
        });
    }

    /**
     * Reverse the migrations.
     */
    public function down(): void
    {
        Schema::dropIfExists('events');
    }
};
Step 3: Connect database
In this step, we will connect the database, and I am going to use MySQL. So connect it like the below by updating the .env file:
.env
DB_CONNECTION=mysql
DB_HOST=127.0.0.1
DB_PORT=3306
DB_DATABASE=tutorial
DB_USERNAME=root
DB_PASSWORD=
Now run the below command to generate an events table:
php artisan migrate
Step 4: Create Route
Now in this step, create a route like the one below to complete the laravel calendar example tutorial. I am going to use an Ajax request. So we can create this fullcalendar laravel 10.
routes/web.php
<?php

use App\Http\Controllers\EventController;
use Illuminate\Support\Facades\Route;

/*
|--------------------------------------------------------------------------
| Web Routes
|--------------------------------------------------------------------------
|
| Here is where you can register web routes for your application. These
| routes are loaded by the RouteServiceProvider and all of them will
| be assigned to the "web" middleware group. Make something great!
|
*/


Route::controller(EventController::class)->group(function () {
    Route::get('/', 'index')->name('event.get');
    Route::post('/', 'store')->name('event.store');
});
Step 5: Create Controller
Now we have to create EventsController to complete laravel create calendar event. So run the below command to create a controller:
php artisan make:controller EventController
Now update this controller like this:
app/Http/Controllers/EventController.php
<?php

namespace App\Http\Controllers;

use App\Models\Event;
use Illuminate\Http\Request;

class EventController extends Controller
{
    public function index(Request $request)
    {
        if ($request->ajax()) {
            $data = Event::whereDate('start', '>=', $request->start)
                ->whereDate('end',   '<=', $request->end)
                ->get(['id', 'title', 'start', 'end']);

            return response()->json($data);
        }

        return view('welcome');
    }

    public function store(Request $request)
    {
        switch ($request->type) {
            case 'add':
                $event = Event::create([
                    'title' => $request->title,
                    'start' => $request->start,
                    'end' => $request->end,
                ]);
                return response()->json($event);
                break;

            case 'update':
                $event = Event::find($request->id)->update([
                    'title' => $request->title,
                    'start' => $request->start,
                    'end' => $request->end,
                ]);
                return response()->json($event);
                break;

            case 'delete':
                $event = Event::find($request->id)->delete();
                return response()->json($event);
                break;

            default:
                break;
        }
    }
}
Step 6: Create Views
In this final step, we have to create an HTML form. So create it in the following path and update it like this:
resources/view/welcome.blade.php
<!DOCTYPE html>
<html>
<head>
    <title>Laravel Calender Event Tutorial</title>
    <meta name="csrf-token" content="{{ csrf_token() }}">
    <link rel="stylesheet" href="https://stackpath.bootstrapcdn.com/bootstrap/4.3.1/css/bootstrap.min.css" />
    <script src="https://cdnjs.cloudflare.com/ajax/libs/jquery/3.1.1/jquery.min.js"></script>
    <link rel="stylesheet" href="https://cdnjs.cloudflare.com/ajax/libs/fullcalendar/3.9.0/fullcalendar.css" />
    <script src="https://cdnjs.cloudflare.com/ajax/libs/moment.js/2.24.0/moment.min.js"></script>
    <script src="https://cdnjs.cloudflare.com/ajax/libs/fullcalendar/3.9.0/fullcalendar.js"></script>
</head>
<body>
    <div class="container">
        <h1>Laravel Calender Event Tutorial - Laravelia</h1>
        <div id='calendar'></div>
    </div>
    <script>
    $(document).ready(function () {
        var calendar = $('#calendar').fullCalendar({
            editable:true,
            header:{
                left:'prev,next today',
                center:'title',
                right:'month,agendaWeek,agendaDay'
            },
            events:'/',
            selectable:true,
            selectHelper: true,
            select:function(start, end, allDay)
            {
                var title = prompt('Event Title:');

                if(title)
                {
                    var start = $.fullCalendar.formatDate(start, 'Y-MM-DD HH:mm:ss');

                    var end = $.fullCalendar.formatDate(end, 'Y-MM-DD HH:mm:ss');

                    $.ajax({
                        url:"{{ route('event.store') }}",
                        type:"POST",
                        headers:{
                            'X-CSRF-TOKEN' : $('meta[name="csrf-token"]').attr('content')
                        },
                        data:{
                            title: title,
                            start: start,
                            end: end,
                            type: 'add'
                        },
                        success:function(data)
                        {
                            calendar.fullCalendar('refetchEvents');
                            alert("Event created");
                        }
                    })
                }
            },
            editable:true,
            eventResize: function(event, delta)
            {
                var start = $.fullCalendar.formatDate(event.start, 'Y-MM-DD HH:mm:ss');
                var end = $.fullCalendar.formatDate(event.end, 'Y-MM-DD HH:mm:ss');
                var title = event.title;
                var id = event.id;
                $.ajax({
                    url:"{{ route('event.store') }}",
                    type:"POST",
                    headers:{
                        'X-CSRF-TOKEN' : $('meta[name="csrf-token"]').attr('content')
                    },
                    data:{
                        title: title,
                        start: start,
                        end: end,
                        id: id,
                        type: 'update'
                    },
                    success:function(response)
                    {
                        calendar.fullCalendar('refetchEvents');
                        alert("Event updated");
                    }
                })
            },
            eventDrop: function(event, delta)
            {
                var start = $.fullCalendar.formatDate(event.start, 'Y-MM-DD HH:mm:ss');
                var end = $.fullCalendar.formatDate(event.end, 'Y-MM-DD HH:mm:ss');
                var title = event.title;
                var id = event.id;
                $.ajax({
                    url:"{{ route('event.store') }}",
                    type:"POST",
                    headers:{
                        'X-CSRF-TOKEN' : $('meta[name="csrf-token"]').attr('content')
                    },
                    data:{
                        title: title,
                        start: start,
                        end: end,
                        id: id,
                        type: 'update'
                    },
                    success:function(response)
                    {
                        calendar.fullCalendar('refetchEvents');
                        alert("Event updated");
                    }
                })
            },
            eventClick:function(event)
            {
                if(confirm("Are you sure you want to remove it?"))
                {
                    var id = event.id;
                    $.ajax({
                        url:"{{ route('event.store') }}",
                        type:"POST",
                        headers:{
                            'X-CSRF-TOKEN' : $('meta[name="csrf-token"]').attr('content')
                        },
                        data:{
                            id:id,
                            type:"delete"
                        },
                        success:function(response){
                            calendar.fullCalendar('refetchEvents');
                            alert("Event deleted");
                        }
                    })
                }
            }
        });
    });
    </script>
</body>
</html>
Read also: How To Check Request Type In Laravel 10 Application
Conclusion
After completing this laravel create calendar event tutorial, hope now you konw how to use FullCalendar in laravel 10 application. Hope this fullcalendar laravel 10 tutorial will help you