
Sending mail in Laravel 10 is a little bit different from other versions and we will look at all the Laravel 10 available mail options in this tutorial. In this tutorial, we will create a test mail for sending to someone using Laravel 10 version.
In normal mailable classes, there are some methods like content(), attachments(), and envelope(). Content for sending data with the view. Envelope for setup reply to and who is sender with subject information and attachments for sending the file.
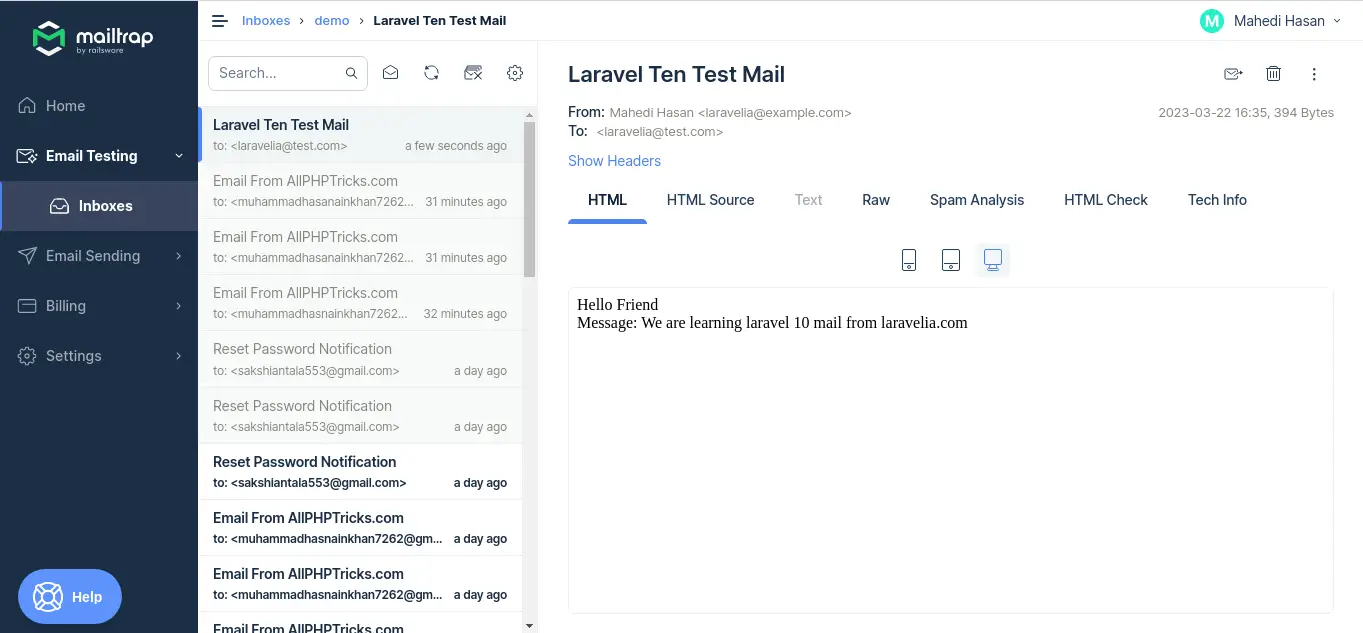
We will create a simple mailable class and then send dynamic data with this mail to the users. See the demo image which we are going to implement. See the image of What are the email options in Laravel and how to send mail in Laravel 10.
Step 1: Install Laravel 10
In the first step, we need a fresh laravel application. So open terminal and run the below command:
composer create-project laravel/laravel example-app
Step 2: Make Configuration
For this tutorial purpose, we will use demo credentials from mail trap so that we can send mail from the localhost server. Update the env file with the following credentials.
.env
MAIL_MAILER=smtp
MAIL_HOST=sandbox.smtp.mailtrap.io
MAIL_PORT=2525
MAIL_USERNAME=bcca41cf7e855f
MAIL_PASSWORD=c1abf4f6f9596d
MAIL_ENCRYPTION=tls
MAIL_FROM_ADDRESS="laravelia@tutorial.com"
MAIL_FROM_NAME="${APP_NAME}"
Read also: Laravel 10 Throttle Rate Limiters Middleware Example
Step 3: Create Mail
There is an artisan command to create a mail class in Laravel. We can run make:mail command to create a mail class. Run the below command to create a mail class.
php artisan make:mail LaravelTenTestMail
Now, let's update the code on the LaravelTenTestMail.php file as below:
app/Mail/LaravelTenTestMail.php
<?php

namespace App\Mail;

use Illuminate\Bus\Queueable;
use Illuminate\Contracts\Queue\ShouldQueue;
use Illuminate\Mail\Mailable;
use Illuminate\Mail\Mailables\Content;
use Illuminate\Mail\Mailables\Envelope;
use Illuminate\Queue\SerializesModels;
use Illuminate\Mail\Mailables\Address;

class LaravelTenTestMail extends Mailable
{
    use Queueable, SerializesModels;

    public $data;

    /**
     * Create a new message instance.
     */
    public function __construct($data)
    {
        $this->data = $data;
    }

    /**
     * Get the message envelope.
     */
    public function envelope(): Envelope
    {
        return new Envelope(
            from: new Address('laravelia@example.com', 'Mahedi Hasan'),
            subject: 'Laravel Ten Test Mail',
        );
    }

    /**
     * Get the message content definition.
     */
    public function content(): Content
    {
        return new Content(
            view: 'email.test',
            with: [
                'data' => $this->data
            ]
        );
    }

    /**
     * Get the attachments for the message.
     *
     * @return array<int, \Illuminate\Mail\Mailables\Attachment>
     */
    // public function attachments(): array
    // {
    //     return [];
    // }
}
If you would like, you may also specify a replyTo address:
return new Envelope(
    from: new Address('laravelia@example.com', 'Laravelia'),
    replyTo: [
        new Address('test@example.com', 'test'),
    ],
    subject: 'Good Friendship',
);
Step 4: Add Routes
We are not going to create any controllers. We will send mail from the web.php file. So update the file like below:
<?php

use App\Mail\LaravelTenTestMail;
use Illuminate\Support\Facades\Mail;
use Illuminate\Support\Facades\Route;

Route::get('laravel_ten_test_mail', function () {
    $data = "We are learning Laravel 10 mail from laravelia.com";

    Mail::to('laravelia@test.com')->send(
        new LaravelTenTestMail($data)
    );

    dd('Mail send successfully.');
});
Step 5: Create Email View
In this step, we will create a blade view file and write the email that we want to send. now we just echo out our dynamic message like:
resources/views/email/test.blade.php
Hello Friend <br>

<div>
    Message: {{ $data }}
</div>
Now you can test by visiting the below URL:
URL
Read also: How To Send Email In Laravel With Multiple CC And BCC
Conclusion
I have tried to discuss the clear concept of laravel 10 email. Now, what are the email options in Laravel we know it clearly. Hope this send email laravel 10 example tutorial will help you.