
Unlike JWT or Passport API authentication in Laravel, sanctum provides a very clean and very tiny step API authentication which is very simple to use and very simple to create. By default, Laravel provides all the configuration for the Sanctum API authentication. No need to install any package for it. By default, Laravel provides an inbuilt installation of the sanctum.
In this tutorial, we will see how to create an API with authentication in Laravel. We will use Sanctum to create this REST API authentication in Laravel 10 application. So you will see a complete tutorial of Laravel 10 sanctum API authentication. To create this sanctum authentication, we need the HasApiTokens trait in our user model. Using this trait, we will create a token for API authentication. Let's see the example tutorial of Laravel sanctum API authentication example:
Step 1: Install Laravel 10
First of all, we need to get a fresh Laravel 10 version application using the bellow command to start laravel api authentication with sanctum.
composer create-project laravel/laravel example-app
Step 2: Connect Database
I am going to use the MYSQL database for this laravel 10 sanctum api authentication. So connect the database by updating.env like this:
.env
DB_CONNECTION=mysql
DB_HOST=127.0.0.1
DB_PORT=3306
DB_DATABASE=YOUR_DB_NAME
DB_USERNAME=YOUR_DB_USERNAME
DB_PASSWORD=YOUR_DB_PASSWORD
Now run php artisan migrate command to migrate the database.
Read also: Laravel 10 JWT - Complete API Authentication Tutorial
Now we need to update the Kernel.php file to use Sanctum. So uncomment the sanctum middleware like below:
app/Http/Kernel.php
'api' => [
  \Laravel\Sanctum\Http\Middleware\EnsureFrontendRequestsAreStateful::class,
  \Illuminate\Routing\Middleware\ThrottleRequests::class.':api',
  \Illuminate\Routing\Middleware\SubstituteBindings::class,
],
Step 3: Create Route
Here, we need to add routes to create this laravel sanctum tutorial. So update the api routes file like this:
routes/api.php
<?php

use Illuminate\Support\Facades\Route;
use App\Http\Controllers\API\AuthController;

Route::controller(AuthController::class)->group(function () {
    Route::post('login', 'login');
    Route::post('register', 'register');
    Route::post('logout', 'logout');
});
Step 4: Create Controller
Now we have to create AuthController to complete our laravel sanctum token tutorial. So run the below command to create a controller:
php artisan make:controller API/AuthController
Now update this controller like this:
app/Http/Controllers/API/AuthController.php
<?php
namespace App\Http\Controllers\API;
use App\Models\User;
use Illuminate\Http\Request;
use App\Http\Controllers\Controller;
use Illuminate\Support\Facades\Auth;
use Illuminate\Support\Facades\Hash;
class AuthController extends Controller
{
public function __construct()
{
$this->middleware('auth:sanctum', ['except' => ['login', 'register']]);
}
public function login(Request $request)
{
$request->validate([
'email' => 'required|string|email',
'password' => 'required|string',
]);
$credentials = $request->only('email', 'password');
if (Auth::attempt($credentials)) {
$user = Auth::user();
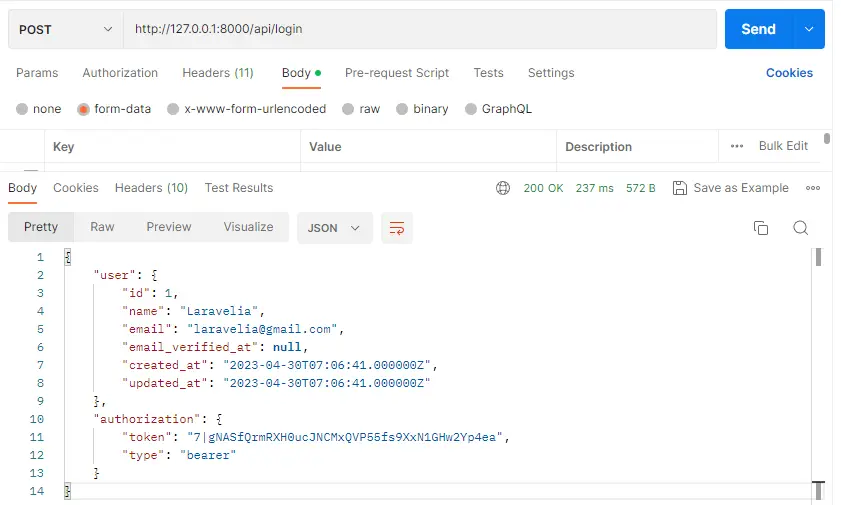
return response()->json([
'user' => $user,
'authorization' => [
'token' => $user->createToken('ApiToken')->plainTextToken,
'type' => 'bearer',
]
]);
}
return response()->json([
'message' => 'Invalid credentials',
], 401);
}
public function register(Request $request)
{
$request->validate([
'name' => 'required|string|max:255',
'email' => 'required|string|email|max:255|unique:users',
'password' => 'required|string|min:6',
]);
$user = User::create([
'name' => $request->name,
'email' => $request->email,
'password' => Hash::make($request->password),
]);
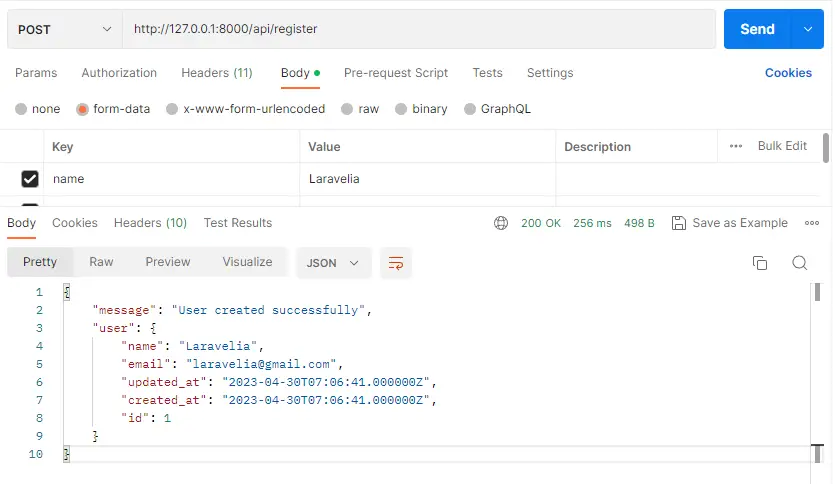
return response()->json([
'message' => 'User created successfully',
'user' => $user
]);
}
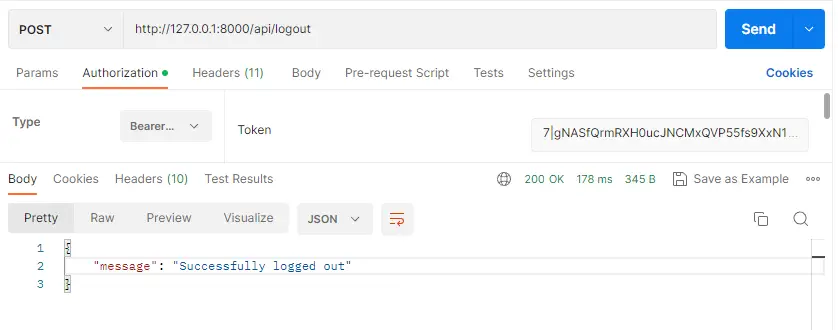
public function logout()
{
Auth::user()->tokens()->delete();
return response()->json([
'message' => 'Successfully logged out',
]);
}
public function refresh()
{
return response()->json([
'user' => Auth::user(),
'authorisation' => [
'token' => Auth::refresh(),
'type' => 'bearer',
]
]);
}
}
Now if you start your server by running php artisan serve and test all API via Postman like this:
REGISTER API
And now see the Postman output:
LOGIN API
And look at that Postman output:
LOGOUT API
Now see the Postman output. Don't forget to add a bearer token with your headers.
Conclusion
After completing this laravel sanctum authentication tutorial, hope now you can create this laravel sanctum api authentication example in your laravel 10 application. Hope this laravel 10 sanctum api authentication tutorial will help you.