
Sometimes you will face such things that you need to add multiple add more input fields in your HTML form. That means you need to clone a specific portion of the DOM every time when a user clicks a button. In this tutorial, we will discuss how to add multiple input fields dynamically with javascript and how to save them into a database using the Laravel application. So let's see how to create dynamically add input fields and save data to database form repeater in laravel application.
We can create this dynamic form in laravel using jQuery of JavaScript very easily. So if you do not know how do you add multiple input fields to a button click then this laravel dynamic form builder example is for you. From this example, you will learn add multiple input fields dynamically with javascript to create this laravel multiple input same name scenario.
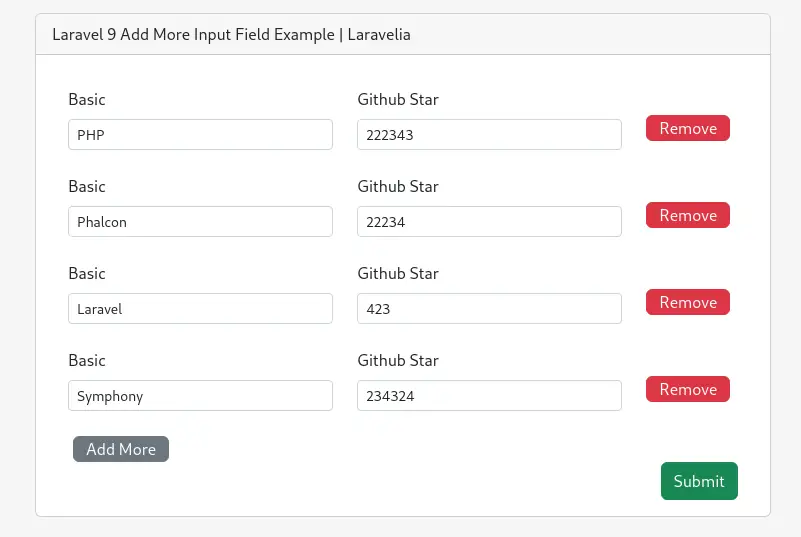
Let's see the preview of laravel add more fields:
Step 1: Download Fresh Laravel
In this first step, we need a fresh Laravel 9 application for add more functionality in laravel. So download it by the below command:
composer create-project laravel/laravel example-app
Step 2: Create Route
Now in this, create a route like the one below to complete the laravel add more fields. So define the resource route like the below:
routes/web.php
<?php

use Illuminate\Support\Facades\Route;
use App\Http\Controllers\TutorialController;

/*
|--------------------------------------------------------------------------
| Web Routes
|--------------------------------------------------------------------------
|
| Here is where you can register web routes for your application. These
| routes are loaded by the RouteServiceProvider within a group which
| contains the "web" middleware group. Now create something great!
|
*/

Route::get('user', [TutorialController::class, 'index'])->name('user.index');
Route::post('user', [TutorialController::class, 'store'])->name('user.store');
Step 3: Create Controller
Now in this step, we have to create a TutorialController to define this method to create those two methods.
php artisan make:controller TutorialController
Now update the controller like the below:
app/Http/Controllers/TutorialController.php
<?php

namespace App\Http\Controllers;

use Illuminate\Http\Request;

class TutorialController extends Controller
{
    public function index()
    {
        return view('welcome');
    }

    public function store(Request $request)
    {
        return $request;
    }
}
Step 4: Create Views
We are almost there. Just we have to create two views files before completing add more in laravel tutorial.
- welcome.balde.php
- app.blade.php
So create these files inside the following path and update them like below:
resources/views/layouts/app.blade.php
<!doctype html>
<html lang="{{ str_replace('_', '-', app()->getLocale()) }}">
<head>
    <meta charset="utf-8">
    <meta name="viewport" content="width=device-width, initial-scale=1">
    <meta name="csrf-token" content="{{ csrf_token() }}">
    <title>{{ config('app.name', 'Laravel') }}</title>
    <link href="https://cdn.jsdelivr.net/npm/bootstrap@5.2.3/dist/css/bootstrap.min.css" rel="stylesheet">
    <script src="https://cdn.jsdelivr.net/npm/bootstrap@5.2.3/dist/js/bootstrap.bundle.min.js"></script>
    @stack('style')
</head>
<body>
    <div id="app">
        <nav class="navbar navbar-expand-md navbar-light bg-white shadow-sm">
            <div class="container">
                <a class="navbar-brand" href="{{ url('/') }}">
                    Laravelia
                </a>
                <button class="navbar-toggler" type="button" data-bs-toggle="collapse" data-bs-target="#navbarSupportedContent" aria-controls="navbarSupportedContent" aria-expanded="false" aria-label="{{ __('Toggle navigation') }}">
                    <span class="navbar-toggler-icon"></span>
                </button>

                <div class="collapse navbar-collapse" id="navbarSupportedContent">
                    <!-- Left Side Of Navbar -->
                    <ul class="navbar-nav me-auto">

                    </ul>

                    <!-- Right Side Of Navbar -->
                    <ul class="navbar-nav ms-auto">
                        <!-- Authentication Links -->
                        @guest
                            @if (Route::has('login'))
                                <li class="nav-item">
                                    <a class="nav-link" href="{{ route('login') }}">{{ __('Login') }}</a>
                                </li>
                            @endif

                            @if (Route::has('register'))
                                <li class="nav-item">
                                    <a class="nav-link" href="{{ route('register') }}">{{ __('Register') }}</a>
                                </li>
                            @endif
                        @else
                            <li class="nav-item dropdown">
                                <a id="navbarDropdown" class="nav-link dropdown-toggle" href="#" role="button" data-bs-toggle="dropdown" aria-haspopup="true" aria-expanded="false" v-pre>
                                    {{ Auth::user()->name }}
                                </a>

                                <div class="dropdown-menu dropdown-menu-end" aria-labelledby="navbarDropdown">
                                    <a class="dropdown-item" href="{{ route('logout') }}"
                                       onclick="event.preventDefault();
                                                     document.getElementById('logout-form').submit();">
                                        {{ __('Logout') }}
                                    </a>

                                    <form id="logout-form" action="{{ route('logout') }}" method="POST" class="d-none">
                                        @csrf
                                    </form>
                                </div>
                            </li>
                        @endguest
                    </ul>
                </div>
            </div>
        </nav>

        <main class="py-4" style="background-color: rgb(245, 245, 245);">
            @yield('content')
        </main>
    </div>
    @stack('script')
</body>
</html>
Now another one for date picker form.
resources/views/welcome.blade.php
@extends('layouts.app')

@section('content')
<div class="container">
    <div class="row justify-content-center">
        <div class="col-md-8">
            <div class="card">
                <div class="card-header">Laravel 9 Add More Input Field Example | Laravelia</div>
                 <div class="card-body">
                    <form class="w-px-500 p-3 p-md-3" action="{{ route('user.store') }}" method="post">
                        @csrf
                        <div class="row clone-row">
                            <div class="col-md-5 mb-4">
                                <label class="form-label">Basic</label>
                                <select class="form-control form-control-sm" name="Language[]">
                                    <option value="AK">PHP</option>
                                    <option value="HI">Laravel</option>
                                    <option value="CA">Cake PHP</option>
                                    <option value="NV">Symphony</option>
                                    <option value="OR">YII</option>
                                    <option value="VA">Zend</option>
                                    <option value="WV">Phalcon</option>
                                </select>
                            </div>
                            <div class="col-md-5 mb-4">
                                <label class="form-label">Github Star</label>
                                <input type="text" name="github_star[]" class="form-control form-control-sm">
                            </div>
                            <div class="col-md-1" style="margin-top:27px;">
                                <span class="btn btn-danger btn-xs pull-right btn-del-select py-0">Remove</span>
                            </div>
                        </div>
                        <div class="col-md-2" style="margin-left: 5px;">
                            <span class="btn btn-secondary btn-xs add-select py-0">Add More</span>
                        </div>
                        <button type="submit" class="btn btn-success float-end">Submit</button>
                    </form>
                </div>
            </div>
        </div>
    </div>
</div>
@endsection

@push('script')
<script src="//ajax.googleapis.com/ajax/libs/jquery/1.12.4/jquery.min.js"></script>
<script>
    $('.btn-del-select').hide();
    $(document).on('click','.add-select', function(){
        $(this).parent().parent().find(".clone-row").clone().insertBefore($(this).parent()).removeClass("clone-row");
        $('.btn-del-select').fadeIn();
        $(this).parent().parent().find(".btn-del-select").click(function(e) {
            $(this).parent().parent().remove();
        });
    });
</script>
@endpush
Read also: JQuery Get Selected Option Value OnChange Example
Now if you submit the form, you will see the following output:
{
    "_token": "2cKgm3eUehdSK63q65hll9N07xuC9HR91FxK16F0",
    "Language": [
        "AK",
        "HI",
        "CA"
    ],
    "github_star": [
        "22",
        "2222",
        "22222"
    ]
}
Conclusion
Now we know laravel 9 dynamically add form fields. Hope this add multiple input fields dynamically with javascript tutorial will help you. After completing this laravel multiple input same name tutorial, your concept will be clear about add multiple input fields dynamically with jquery. Hope add more functionality in laravel tutorial will clear your concept about add more in laravel.